Admin Panel User Guide
A complete, screenshot-by-screenshot walkthrough of every section in the Coduo admin panel.
Welcome to the Coduo Admin Panel
The Coduo Admin Panel is a web-based control centre that gives you full control over every aspect of your platform — from managing learners and content to processing payments and configuring gamification. This guide walks through every section with screenshots so you know exactly what each screen does.
How to Access the Admin Panel
Open your admin panel URL in any browser. The default URL after deployment is:
https://YOUR_APP_NAME-admin.web.appAdmin Panel Sidebar Navigation
The left sidebar contains all main sections. Click any section header to expand or collapse its sub-items. The panel is fully responsive — on smaller screens the sidebar collapses into a hamburger menu at the top.
| Sidebar Section | What It Contains |
|---|---|
| OVERVIEW | Dashboard stats, charts, and Audit Logs |
| CONTENT | Reserved for future content management features |
| USERS & COMMUNITY | User management, Public Profiles, Clubs Manager |
| PAYMENTS & REVENUE | Payment Settings, Transactions, Bank Transfers, Revenue Analytics, Currency Management, Subscription Plans, Author Withdrawals |
| CODING PLATFORM | Track Manager, Lessons, Challenges, Assessment Editor, Playground Config, Project Editor, Interview Sets, Onboarding Config |
| ENGAGEMENT & REWARDS | Streak Freeze Config, Gem Shop Config, Daily Challenge Manager, Cosmetics Manager, Certificates Manager |
| NOTIFICATIONS & SUPPORT | Notifications, Support & Donations |
| SETTINGS | App Settings, AdMob Settings |
admin_users Firestore collection. Regular student accounts cannot access the admin panel.
1.1 — Platform Overview Dashboard
The Platform Overview is the first screen you see after logging in. It gives you a real-time snapshot of your platform's health and activity.
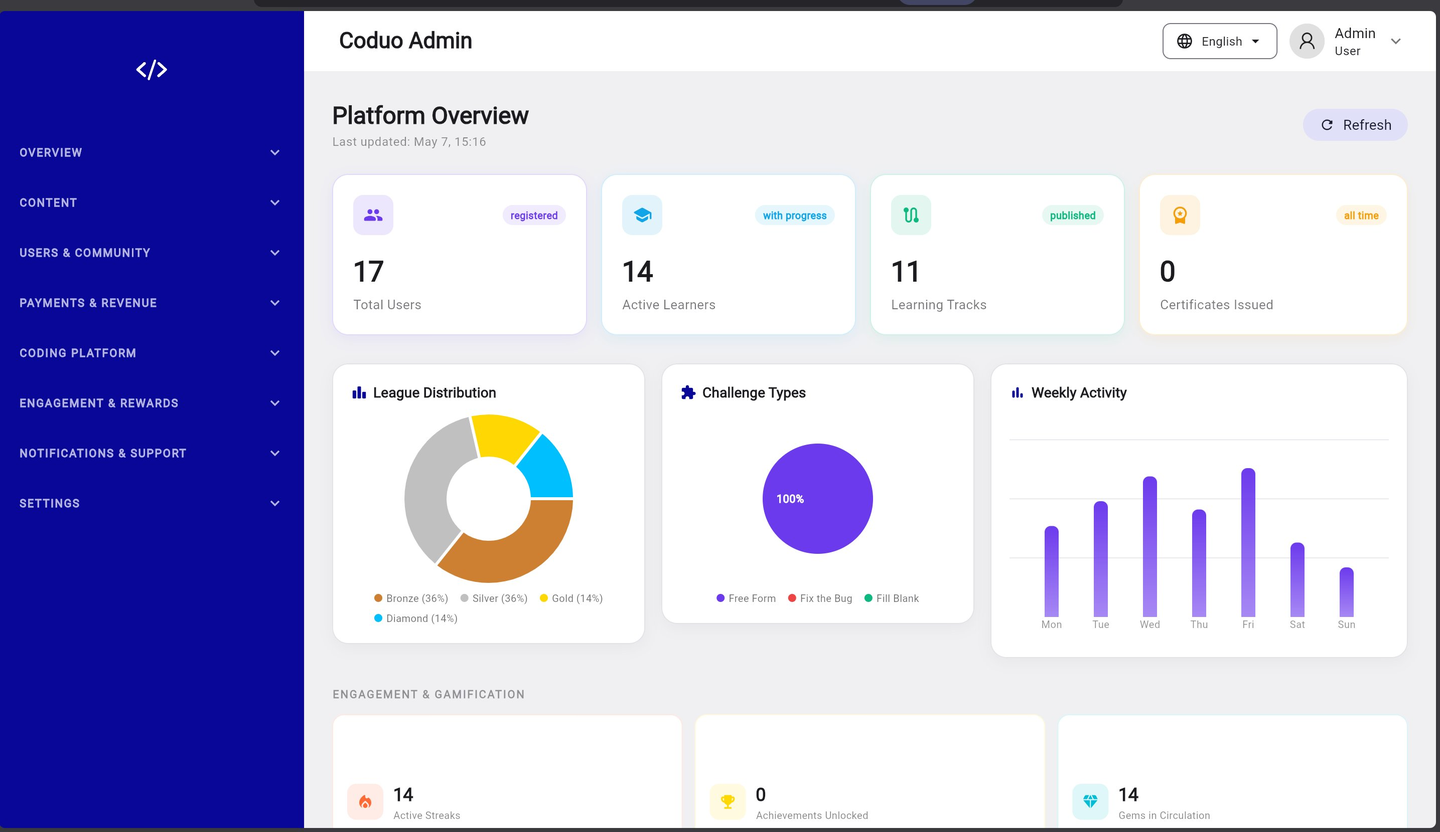
Top Stats Row
| Stat Card | What It Shows |
|---|---|
| Total Users | All registered accounts on the platform (registered) |
| Active Learners | Users who have started at least one learning track (with progress) |
| Learning Tracks | Number of published coding tracks (published) |
| Certificates Issued | Total completion certificates issued to learners (all time) |
Charts Section
- League Distribution — donut chart showing how learners are spread across Bronze, Silver, Gold, and Diamond leagues
- Challenge Types — breakdown of challenge formats used on the platform (Free Form, Fix the Bug, Fill Blank)
- Weekly Activity — bar chart showing daily lesson completions and challenge attempts over the past 7 days
Engagement & Gamification Stats (below fold)
- Active Streaks — number of learners currently maintaining a daily streak
- Achievements Unlocked — total badges earned by all learners
- Gems in Circulation — total gem balance held by all users
1.2 — Audit Logs
Audit Logs record every significant action taken on the platform — logins, payments, content changes, and user modifications. Use this to investigate issues, track admin activity, and maintain accountability.

Filtering Audit Logs
| Filter | How to Use |
|---|---|
| Action Type | Filter by category (All, login, payment, content, user change, etc.) |
| User ID | Enter a specific User UID to see only that user's actions |
| Search | Search by ID, username, or transaction ID |
| Start Date / End Date | Set a date range to narrow results |
| Apply Filters | Click to apply all selected filters simultaneously |
| Clear | Reset all filters and show all entries |
Reading an Audit Log Entry
- Timestamp — when the action occurred (UTC time)
- Action Type — category of action (shown as a badge)
- ID — the user or resource ID associated with the action
- Payment Method / Amount / Transaction ID / Status — populated for payment-related events
- Actions — click the eye icon to view the full detail of that log entry
2.1 — Users
The Users screen is your central directory of every person registered on your platform. You can search, sort, view detailed profiles, and manage roles from here.
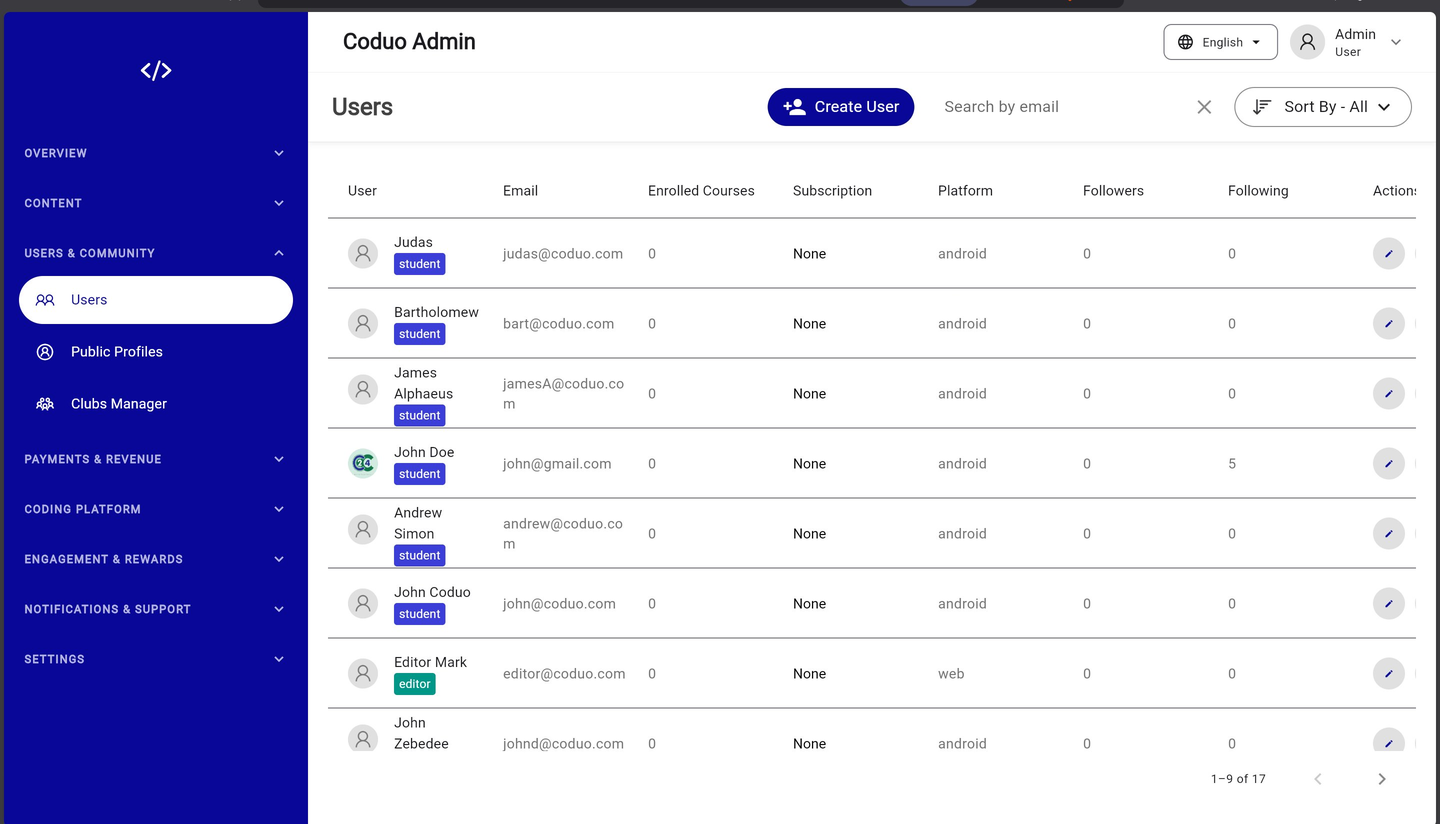
Users Table Columns
| Column | What It Shows |
|---|---|
| User | Display name with role badge (student / editor / admin) |
| Registered email address | |
| Enrolled Courses | Number of courses/tracks the user has started |
| Subscription | Current plan (None / Pro / Premium) |
| Platform | Device platform (android / ios / web) |
| Followers / Following | Social follow counts |
| Actions | Edit and context menu for role management |
Creating a New User
- Click “Create User”
The navy “+ Create User” button is at the top right of the Users screen.
- Fill in the form
Enter name, email, and password. Select the role: student, editor, or admin.
- Save
The user is created in Firebase Auth and added to Firestore simultaneously.
Searching & Sorting
- Use the “Search by email” field at the top to find a specific user instantly
- Use the “Sort By” dropdown to order by join date, XP, subscription status, and more
User Actions (Context Menu)
- View Profile — opens the full User Profile modal with charts
- Edit User — modify name, email, or role
- Assign As Editor — promotes a student to Editor role (limited admin access)
- Disable / Enable — suspend or restore user access without deleting their data
2.2 — User Profile
Clicking a user opens the User Profile modal. This gives you a complete picture of that learner's progress, activity, and job readiness.
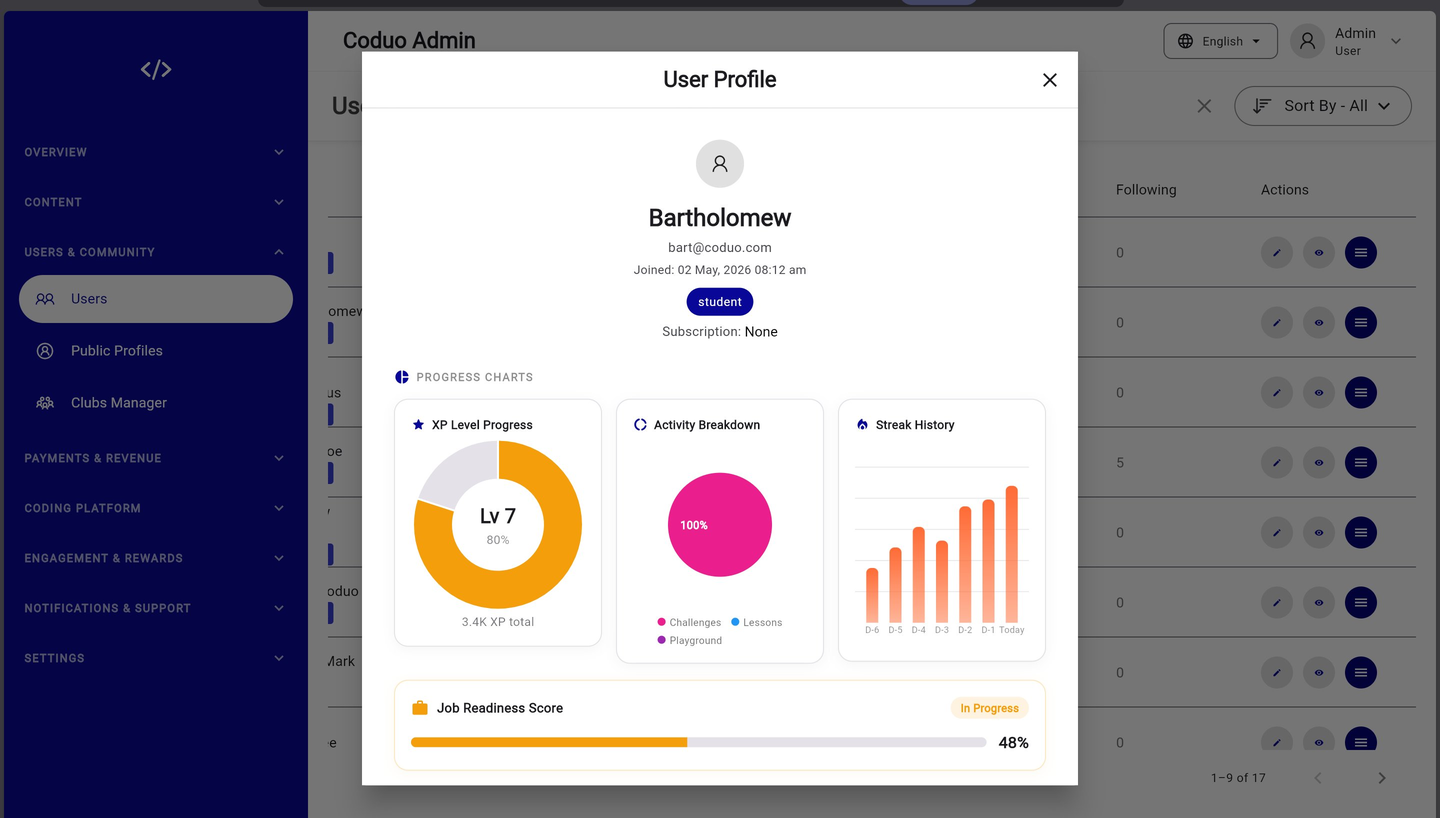
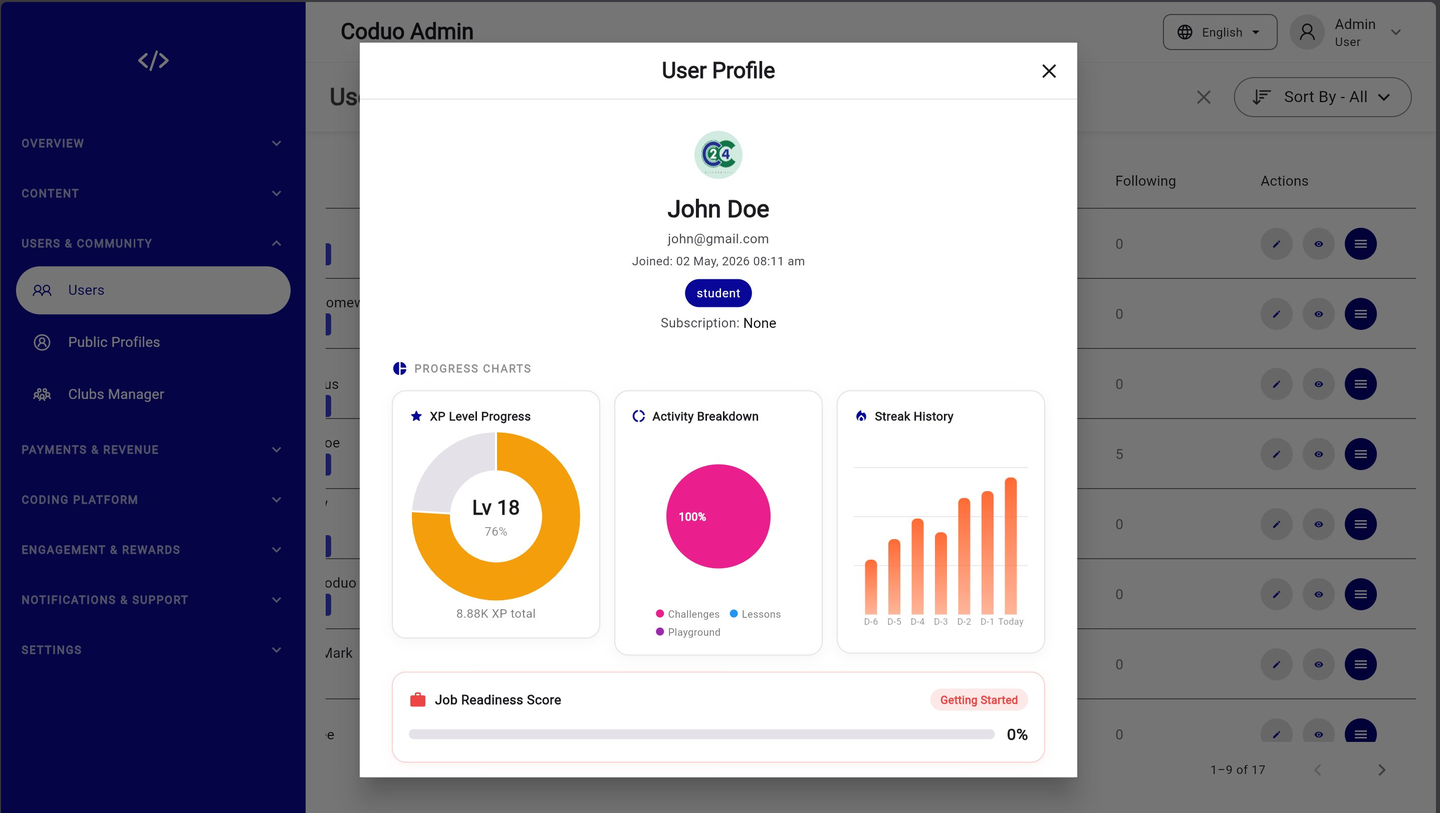
Profile Charts Explained
| Chart | What It Shows |
|---|---|
| XP Level Progress (donut) | Current level number and percentage progress towards next level. Total XP shown below. |
| Activity Breakdown (donut) | Mix of activity types: Challenges, Lessons, Playground usage |
| Streak History (bar chart) | Daily streak activity over the last 7 days |
| Job Readiness Score (progress bar) | Composite score across skills, streaks, and challenge completions. Status labels: Getting Started / In Progress / Ready |
2.3 — Public Profiles
Public Profiles shows the leaderboard-style list of all users who have enabled public visibility. You can search by username and toggle any user's visibility from here.
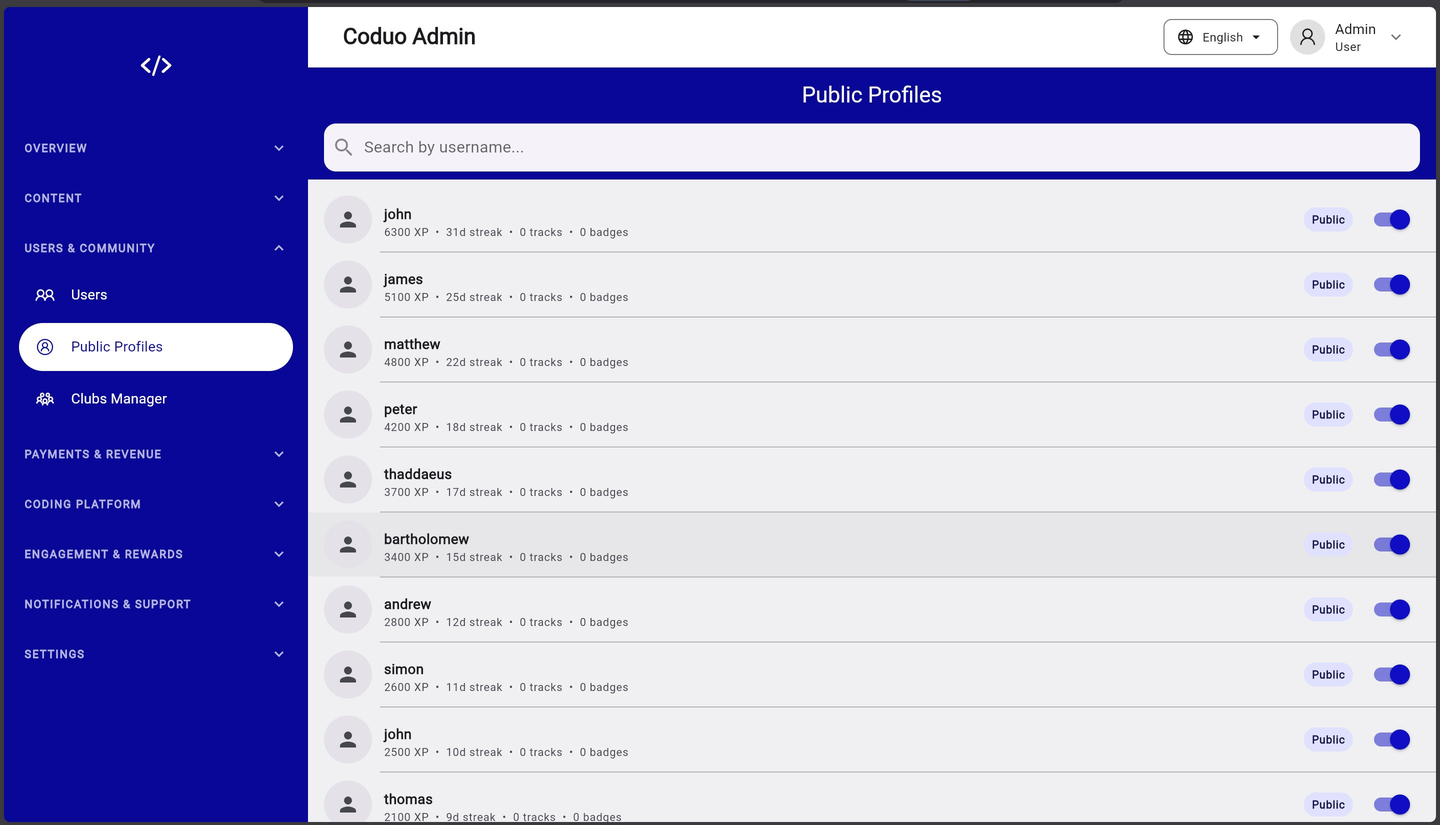
Managing Public Profiles
- Each row shows username, XP total, current streak, tracks completed, and badges earned
- The toggle on the right controls whether that user's profile is publicly visible
- Users can also toggle their own visibility from within the mobile app
- Turning a profile Private hides it from the in-app leaderboard and public profile search
2.4 — Clubs Manager
Coding Clubs are user-created groups where learners can team up, share challenges, and learn together. The Clubs Manager lets you view, moderate, and remove clubs.
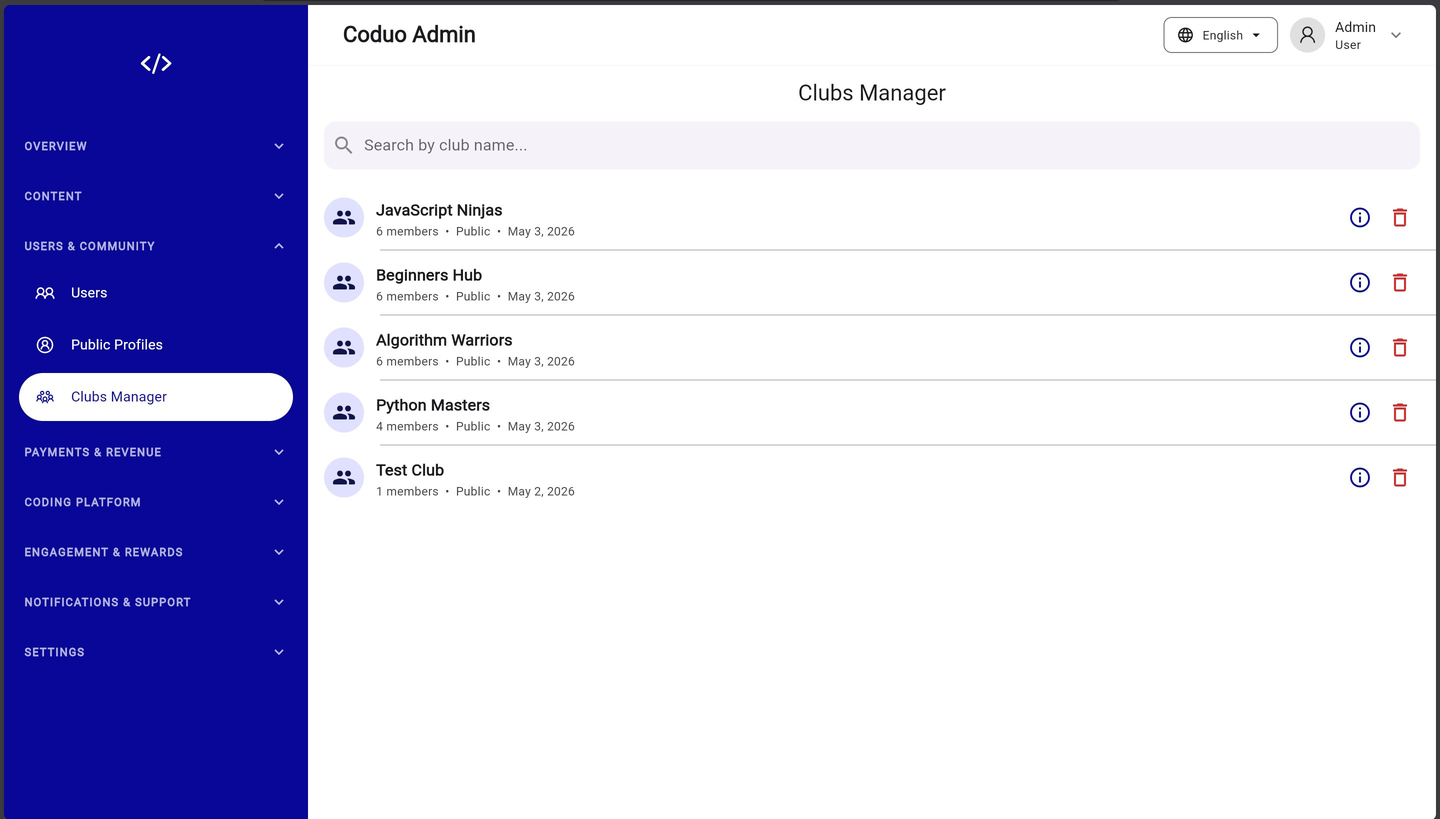
Club Entry Fields
- Club name and avatar icon
- Member count — total users in the club
- Visibility — Public (anyone can join) or Private (invite only)
- Creation date
Available Actions
- Info icon — view club details, member list, and recent activity
- Delete icon — permanently remove a club and notify members; use for clubs that violate community guidelines
3.1 — Payment Settings
Payment Settings is where you configure your payment gateways. The screen is organised into five tabs: Stripe, Paystack, Bank Transfer, Currency, and Author Payouts.
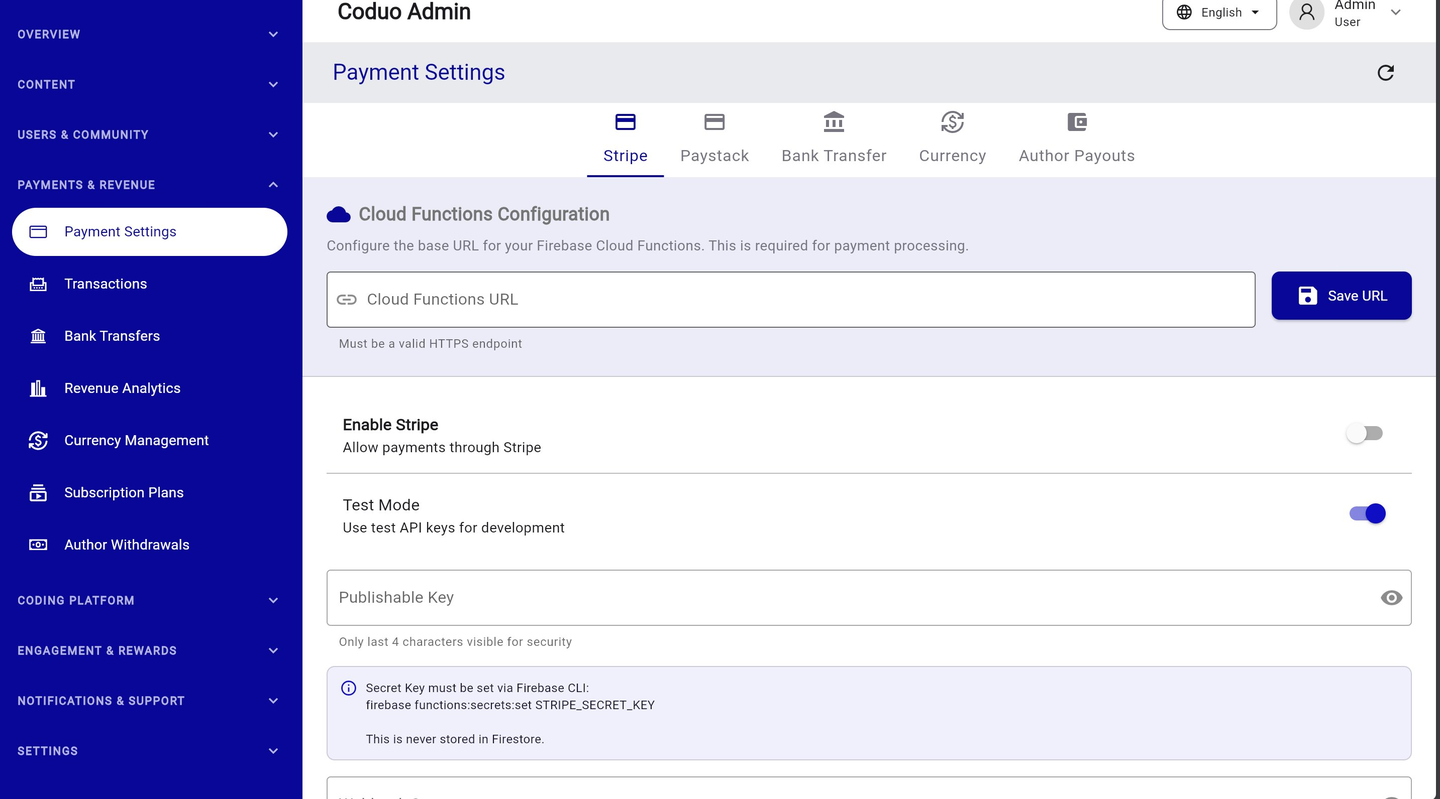
Cloud Functions URL — Required First Step
Before enabling any payment method, you must set the Cloud Functions base URL. This is required for payment processing webhooks.
- Find your Cloud Functions URL
Firebase Console → Functions → copy the base URL (format:
https://REGION-PROJECTID.cloudfunctions.net) - Paste it in the field
Enter the URL in the “Cloud Functions URL” field at the top of the Payment Settings screen.
- Click Save URL
The URL is saved to Firestore and immediately available to the payment functions.
Stripe Tab Settings
| Field | What to Enter |
|---|---|
| Enable Stripe toggle | Turn ON to activate Stripe card payments for users |
| Test Mode toggle | ON = uses test API keys (development); OFF = uses live keys (production) |
| Publishable Key | Your Stripe publishable key (pk_live_... or pk_test_...) |
| Secret Key | Set via Firebase CLI only: firebase functions:secrets:set STRIPE_SECRET_KEY (never stored in Firestore) |
Paystack Tab Settings
- Enable Paystack toggle — activates Paystack for African market card payments
- Test Mode toggle — switch between test and live environments
- Public Key — enter your Paystack public key (pk_live_... or pk_test_...)
- Secret Key — set via Firebase CLI: firebase functions:secrets:set PAYSTACK_SECRET_KEY
Bank Transfer Tab
- Enable Bank Transfer toggle
- Bank Name, Account Number, Account Name — your receiving bank details
- Transfer Instructions — custom message shown to users before they transfer
- Expiry Hours — how many hours a pending bank transfer stays valid before auto-expiring (default: 48)
firebase functions:secrets:set KEY_NAME. Only the publishable/public keys are stored in the admin panel.
3.2 — Transactions
The Transaction Dashboard shows every payment attempt on your platform — successful, failed, pending, expired, and refunded. You can filter, search, and export the full history.
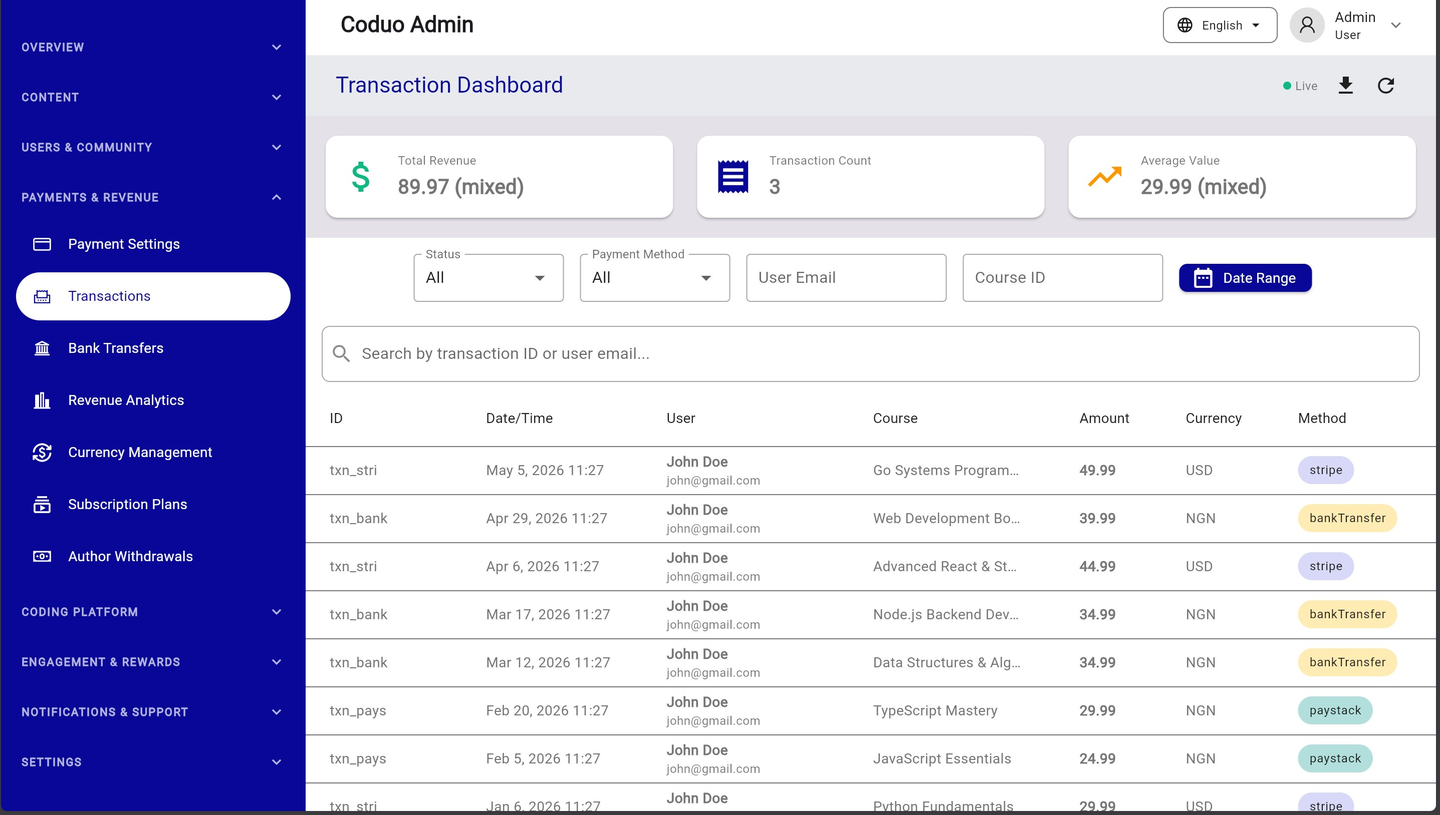
Summary Stats (Top Row)
- Total Revenue — sum of all completed transactions (shown as “mixed” when multiple currencies are in use)
- Transaction Count — total number of transactions matching current filters
- Average Value — average transaction value across the filtered set
Filtering Transactions
| Filter | Options |
|---|---|
| Status | All / pending / completed / failed / expired / refunded / pendingVerification |
| Payment Method | All / stripe / paystack / bankTransfer |
| User Email | Type to filter by a specific user's email |
| Course ID | Filter by a specific course or track slug |
| Date Range | Select start and end dates |
Transaction Detail
Click the eye icon on any row to open the Transaction Details modal:
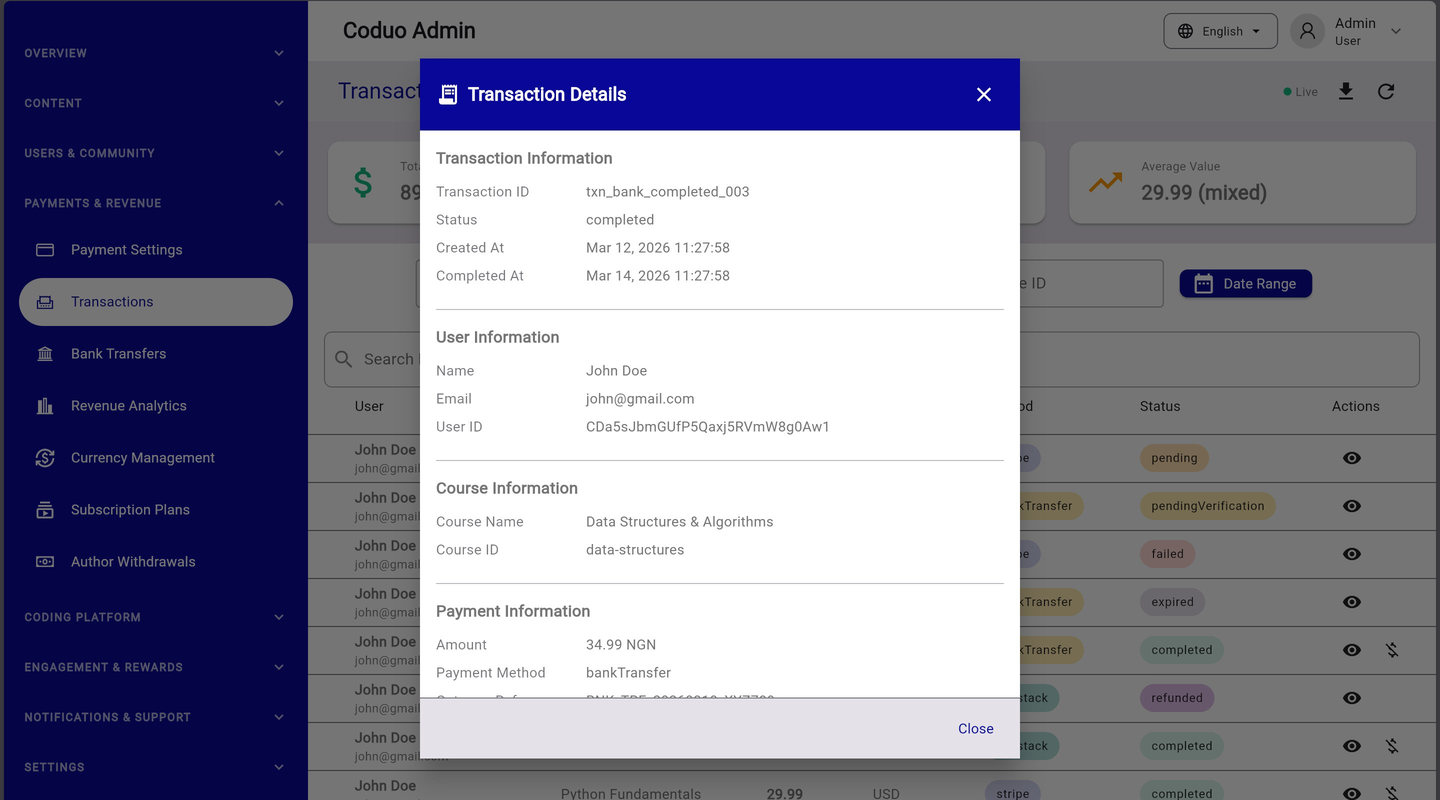
- Transaction Information — ID, status, created at, completed at
- User Information — name, email, User ID
- Course Information — course name, course ID
- Payment Information — amount, currency, payment method, gateway reference
3.3 — Revenue Analytics
The Revenue Analytics Dashboard gives you a visual breakdown of earnings. Use it to understand which payment methods are most popular and which courses are generating the most revenue.
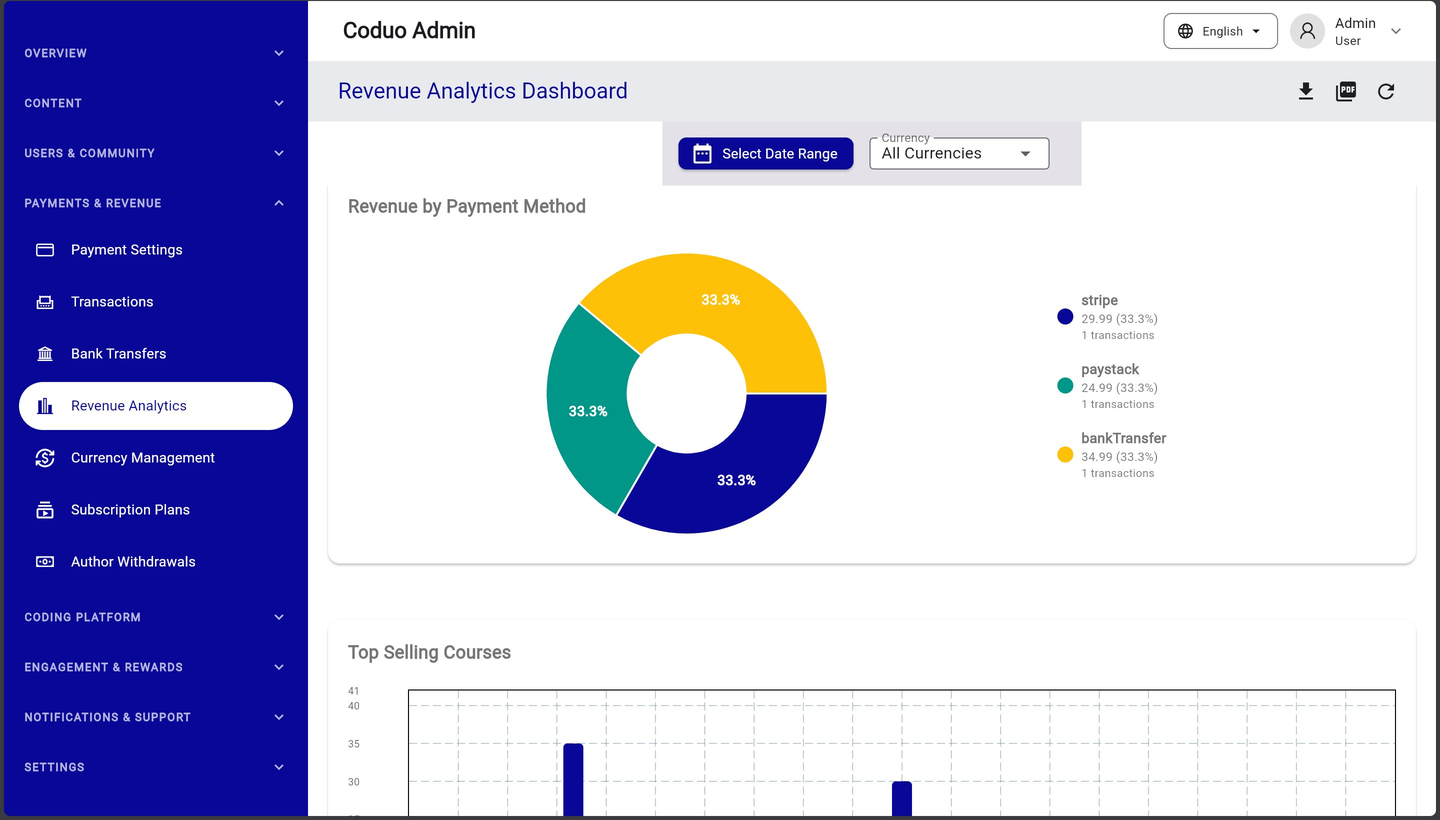
Available Charts
- Revenue by Payment Method — donut chart showing percentage and amount per gateway
- Top Selling Courses — bar chart ranking courses by total revenue generated
Filters
- Select Date Range — filter analytics by a custom date period
- Currency — view in a specific currency or All Currencies combined
- Download icon — export the analytics report as CSV
- PDF icon — generate a PDF revenue report
3.4 — Currency Management
Currency Management lets you add, activate, and manage the exchange rates for all currencies your platform accepts. This controls what currency options users see at checkout.
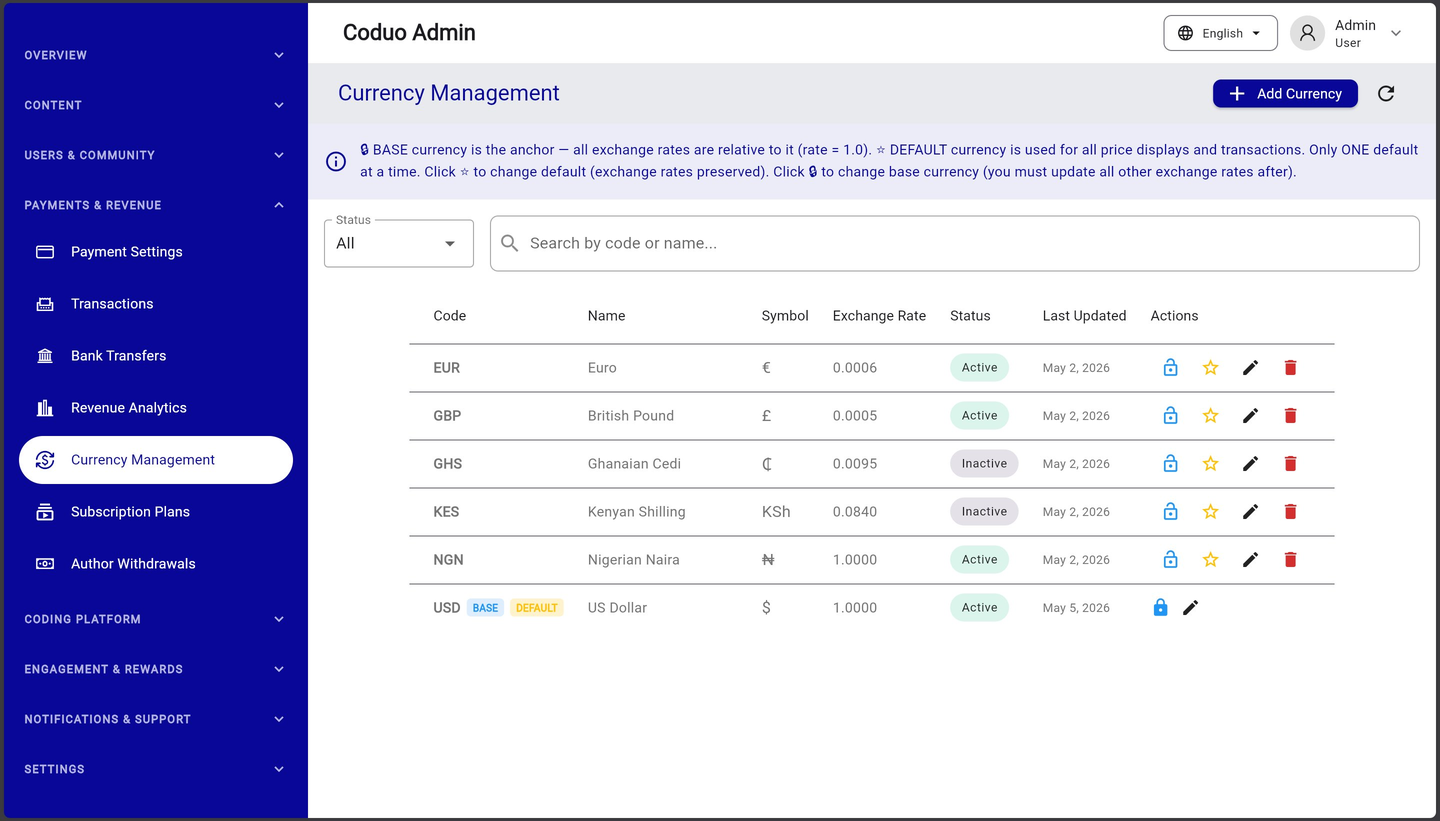
Understanding BASE and DEFAULT Currency
| Label | What It Means |
|---|---|
| BASE | The anchor currency — all exchange rates are relative to it (rate = 1.0). USD is typically the base. Only one BASE at a time. |
| DEFAULT | The currency displayed to users for all prices and at checkout. Only one DEFAULT at a time. |
| Active | Currency is enabled and available for transactions |
| Inactive | Currency is disabled and hidden from users |
Adding a Currency
- Click “+ Add Currency”
Top right of the Currency Management screen.
- Enter currency details
Currency code (e.g. NGN), name (Nigerian Naira), symbol, and exchange rate relative to your base currency.
- Set status
Toggle Active to make it immediately available.
- Save
The currency appears in the list and becomes available at checkout.
3.5 — Subscription Plans
Subscription Plans defines the tiers available to users — Free, Pro, and Premium. These tiers gate access to AI features, lesson limits, challenge attempts, and other premium content.
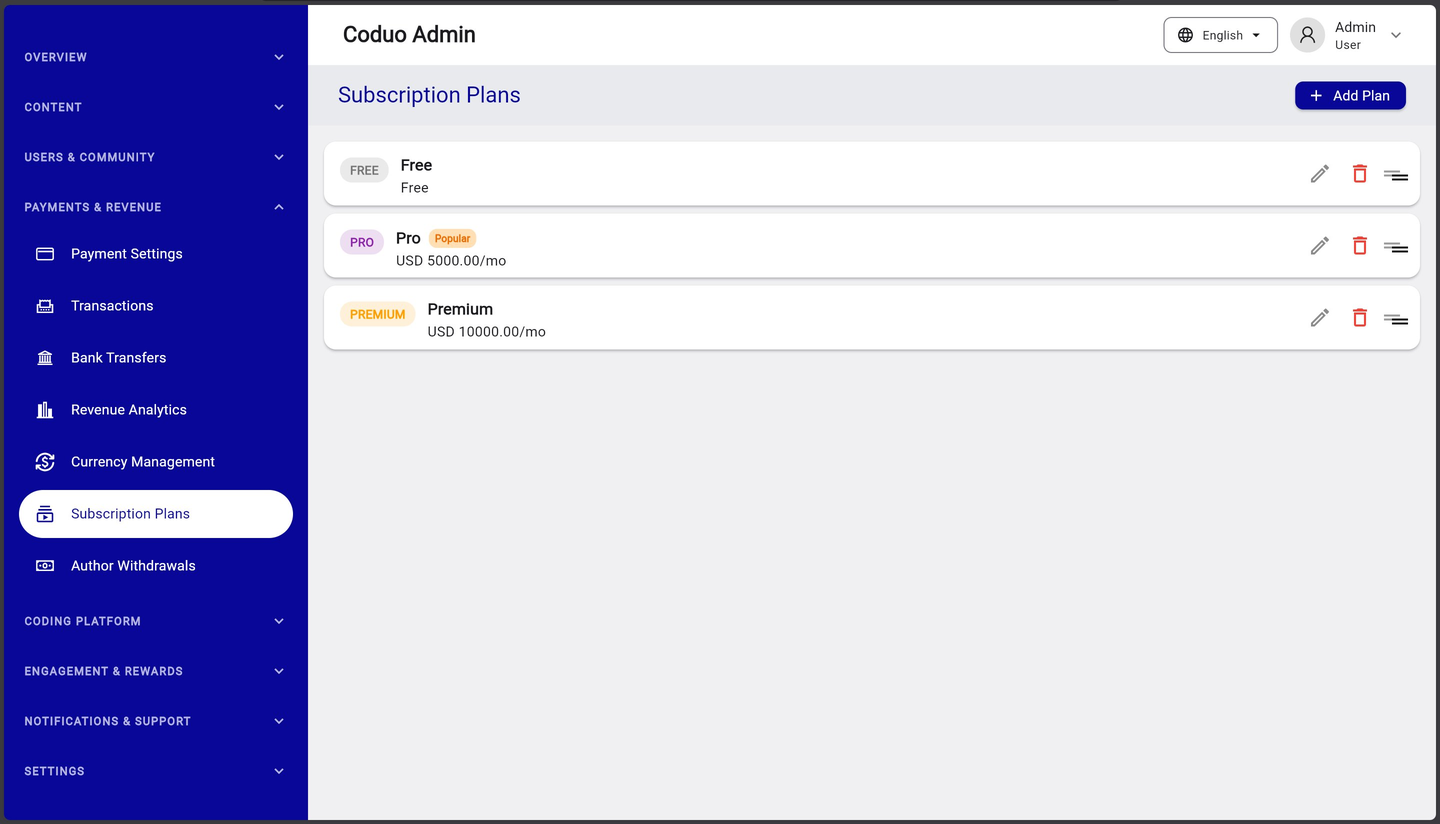
Plan Actions
- Edit — modify plan name, price, currency, features list, and tier identifier
- Delete — remove a plan (only if no active subscribers are on it)
- Reorder — drag to change the display order on the mobile app paywall screen
- + Add Plan — create a new subscription tier
Plan Fields (When Editing)
| Field | Description |
|---|---|
| Name | Display name (e.g. Pro Monthly) |
| Price | Amount in the selected currency |
| Currency | USD, NGN, GHS, or any active currency |
| Interval | monthly or yearly |
| Tier | Internal identifier: free / pro / premium — used by the app to gate features |
| Features List | Bullet points shown on the paywall (e.g. AI Code Review, Unlimited Lessons) |
| Is Active | Toggle to show/hide this plan on the paywall |
4.1 — Track Manager
The Track Manager is where you create and organise your entire learning curriculum. A Track is a complete coding course — it contains Modules, and each Module contains Lessons.
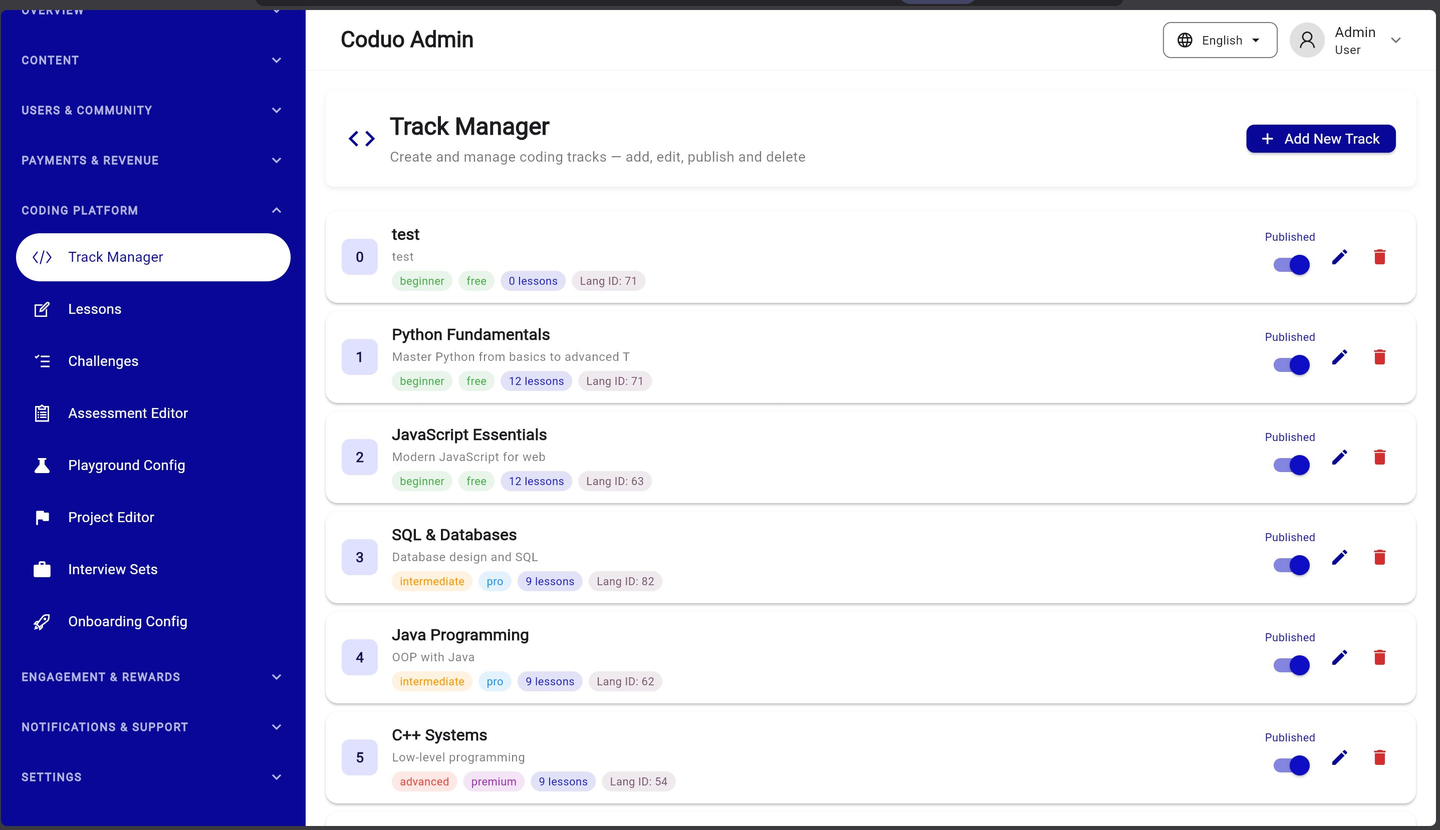
Track List Fields
| Field | Description |
|---|---|
| Order number | The display order in the app (0, 1, 2, 3...) |
| Track name + description | Title and short description shown to learners |
| Difficulty badge | beginner / intermediate / advanced |
| Subscription tier badge | free / pro / premium — determines who can access this track |
| Lesson count | Total lessons across all modules in this track |
| Language ID | Judge0 language ID (71=Python, 63=JS, 82=SQL, 62=Java, 54=C++) |
| Published toggle | Blue = live and visible to learners; Grey = draft (hidden) |
Creating a New Track
- Click “+ Add New Track”
Top right button on the Track Manager screen.
- Fill in the Edit Track form
See the form fields described below.
- Add Modules
Scroll down in the form to the Module Order section. Click “+ Add Module” to create modules within this track.
- Save
Click Save. The track appears in the list as a Draft. Toggle Published when ready to go live.
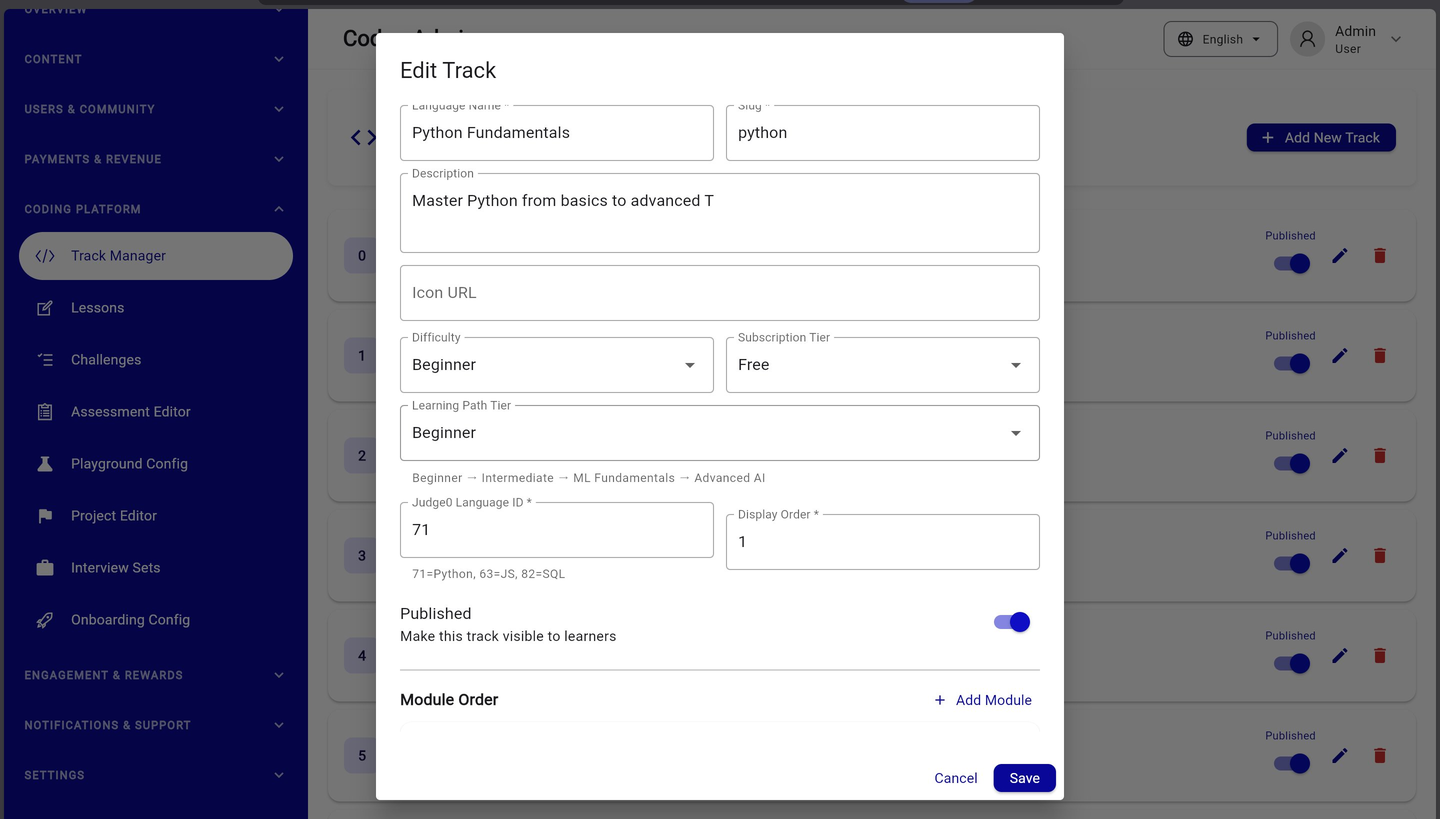
Edit Track Form Fields
| Field | What to Enter |
|---|---|
| Language Name | The display name (e.g. Python Fundamentals) |
| Slug | URL-friendly ID auto-generated from name (e.g. python) |
| Description | Short description shown on the track card |
| Icon URL | URL to a track icon image (optional — hosted on Firebase Storage) |
| Difficulty | Beginner / Intermediate / Advanced |
| Subscription Tier | Free / Pro / Premium — gates who can enrol |
| Learning Path Tier | Beginner → Intermediate → ML Fundamentals → Advanced AI (the overall learning journey stage) |
| Judge0 Language ID | 71=Python, 63=JS, 82=SQL, 62=Java, 54=C++, 60=Go, 74=TypeScript, 78=Kotlin |
| Display Order | Integer controlling position in the track list (lower = higher) |
| Published | Toggle to make the track visible to learners |
| Module Order | Add, reorder, and manage modules within this track |
4.2 — Lessons
The Lesson Editor gives you two ways to work: the global Lessons view lists every lesson across all tracks, while the Track Manager drill-down shows lessons within a specific module. Use the global view to search and edit; use the Track Manager path to create new lessons in context.
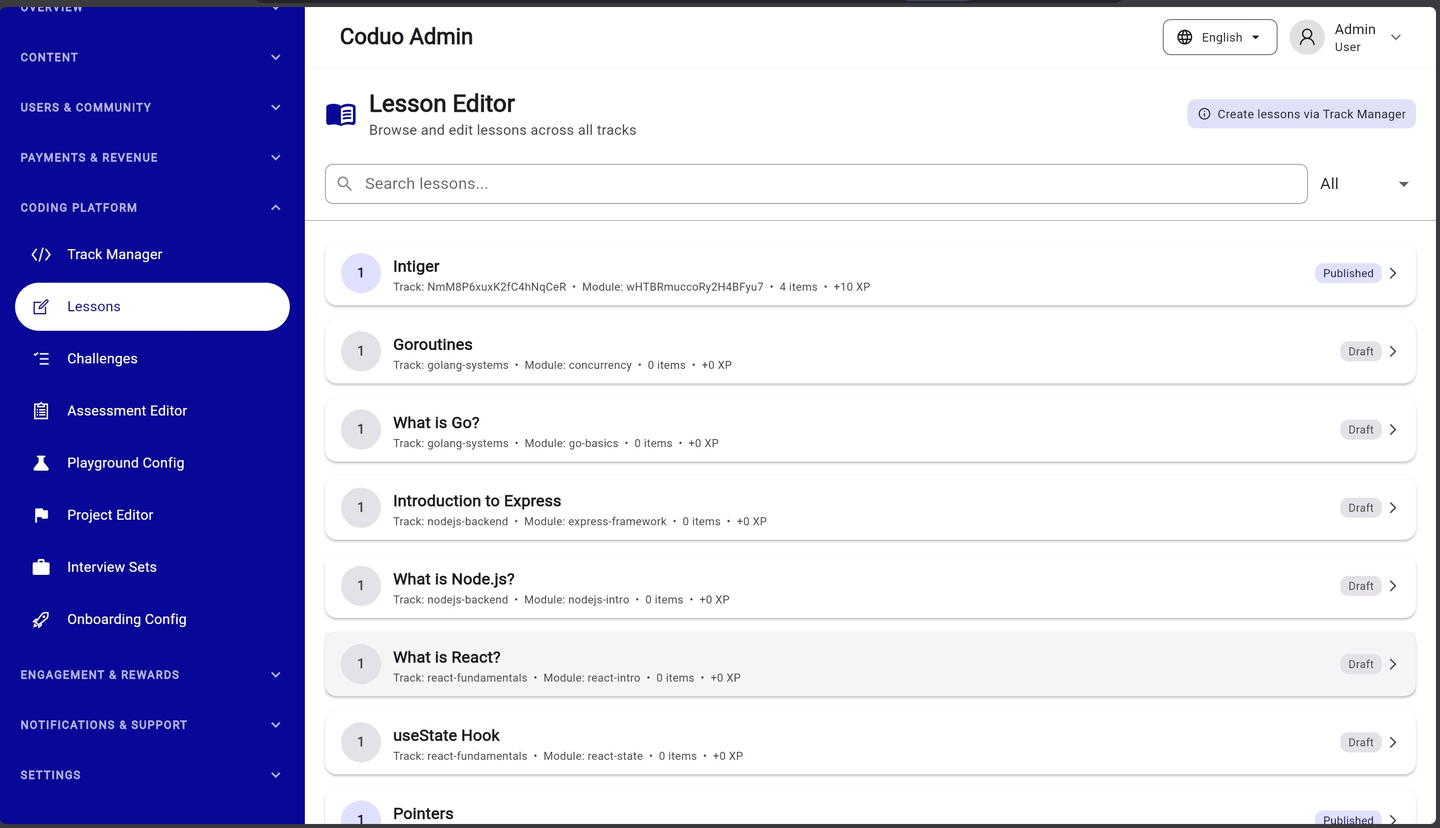
Lesson Actions
- Eye icon — preview the lesson as learners see it
- Edit icon — open the full Lesson Builder to edit content, exercises, and settings
- Delete icon — permanently remove the lesson (admin only — editors cannot delete)
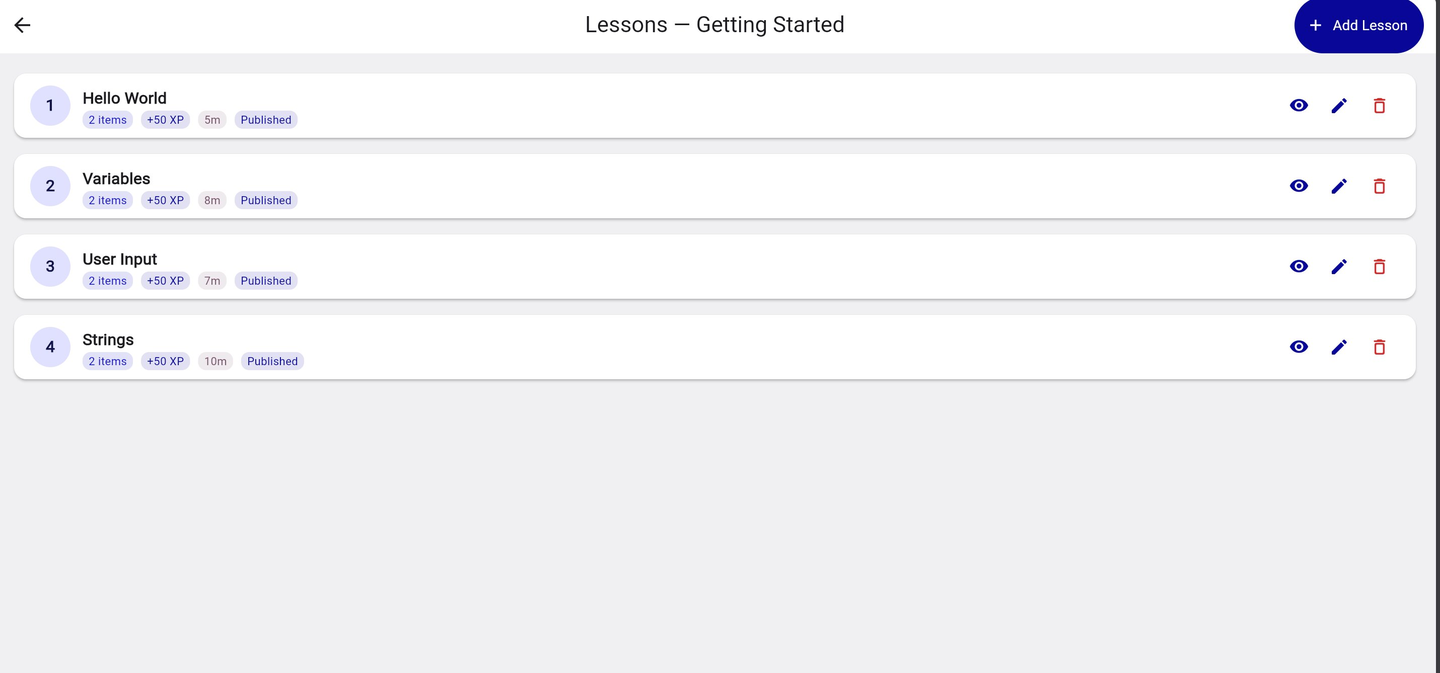
Adding a New Lesson
- Navigate via Track Manager
Track Manager → click a track → click a module → click “+ Add Lesson”
- Fill in lesson details
Title, estimated time, XP reward, and published status
- Add lesson items
Each lesson contains items: concept cards (explanatory text), coding exercises, fill-in-the-blank, or multiple choice
- Add test cases
For coding exercises, add test cases with expected inputs and outputs
- Save and publish
Toggle Published when the lesson is ready for learners
4.3 — Challenge Editor
Standalone coding challenges are separate from tracks. They appear in the Challenges section of the mobile app and can be used for daily challenges. Each challenge has a difficulty, XP reward, and can be set to any subscription tier.
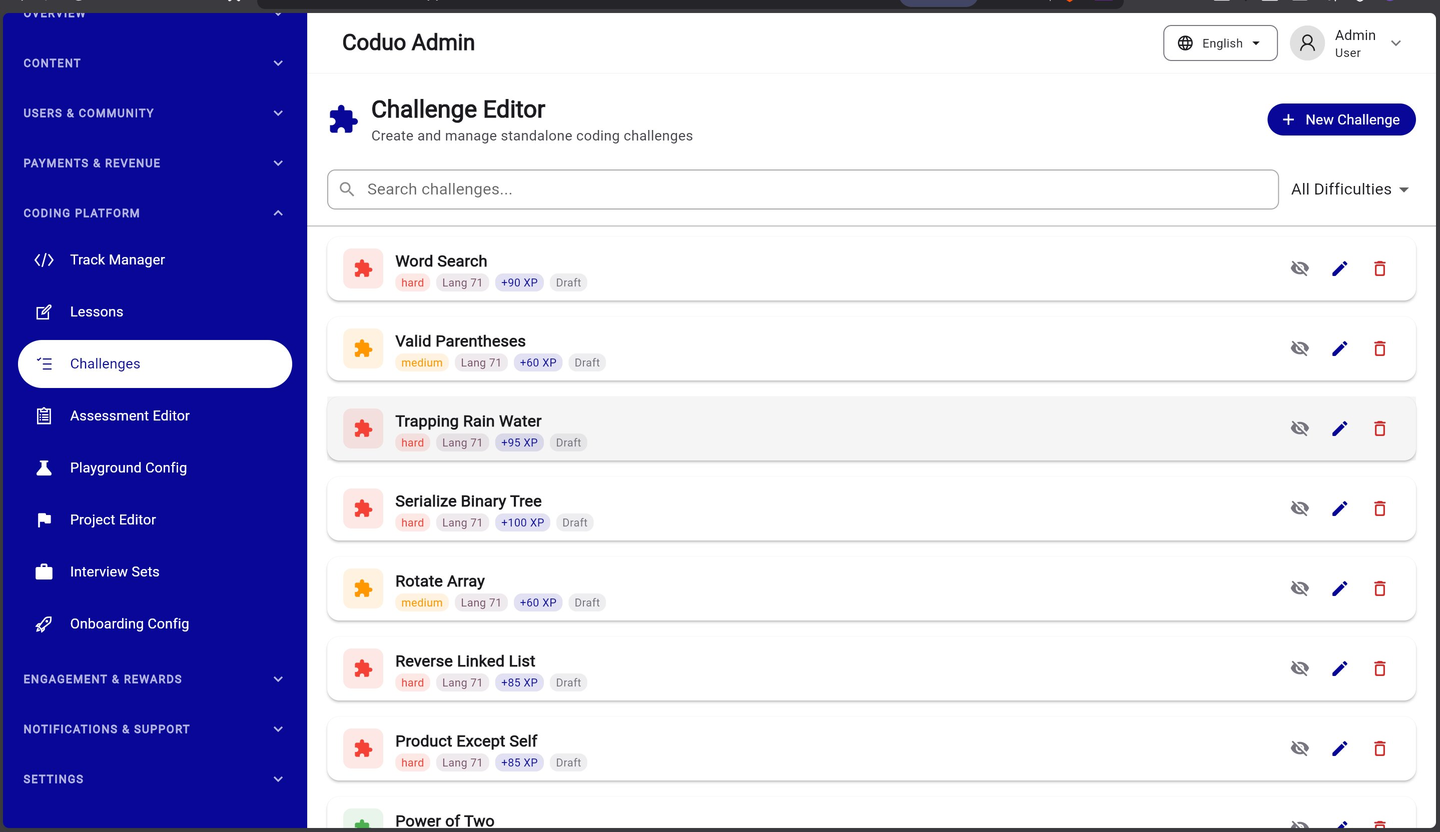
Creating a New Challenge
- Click “+ New Challenge”
Top right button on the Challenge Editor screen.
- Fill in the New Challenge form
See form fields below.
- Write Problem Statement
Use Markdown to describe the problem. A live Preview pane shows how it renders.
- Add Test Cases
Scroll down to add input/output test cases. These are run against the learner's code.
- Save
Click Save. Toggle Published when ready.

New Challenge Form Fields
| Field | Description |
|---|---|
| Challenge Title | Display name shown in the app |
| Slug | Auto-generated URL-friendly ID from title |
| Difficulty | Easy / Medium / Hard |
| Subscription Tier | Free / Pro / Premium |
| XP Reward | XP awarded on successful completion (default: 50) |
| Time Limit | Seconds allowed per attempt (0 = no limit) |
| Topic Tags | Comma-separated tags for filtering (e.g. arrays, strings, loops) |
| Published | Toggle to make visible to learners |
| Challenge Type | Free Form (open coding) / Fix the Bug / Fill Blank |
| Problem Statement | Markdown-formatted problem description with live preview |
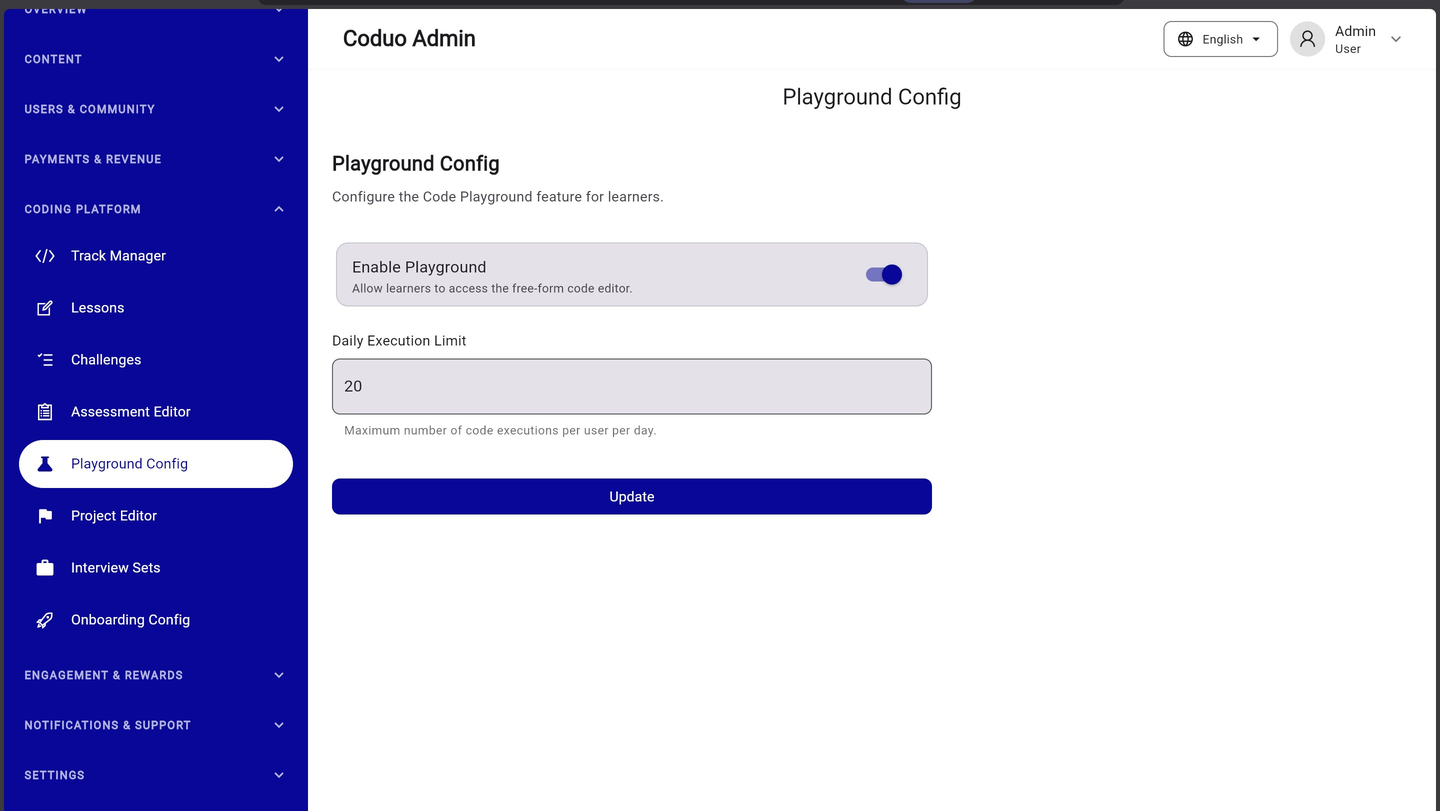
4.4 — Playground Config
The Code Playground is a free-form code editor available to learners for experimenting outside of lessons. Here you control whether it's enabled and how many executions each user gets per day.
| Setting | Description |
|---|---|
| Enable Playground | Toggle ON to give learners access to the free-form code editor |
| Daily Execution Limit | Maximum number of code runs per user per day (default: 20). Set to 0 for unlimited. |
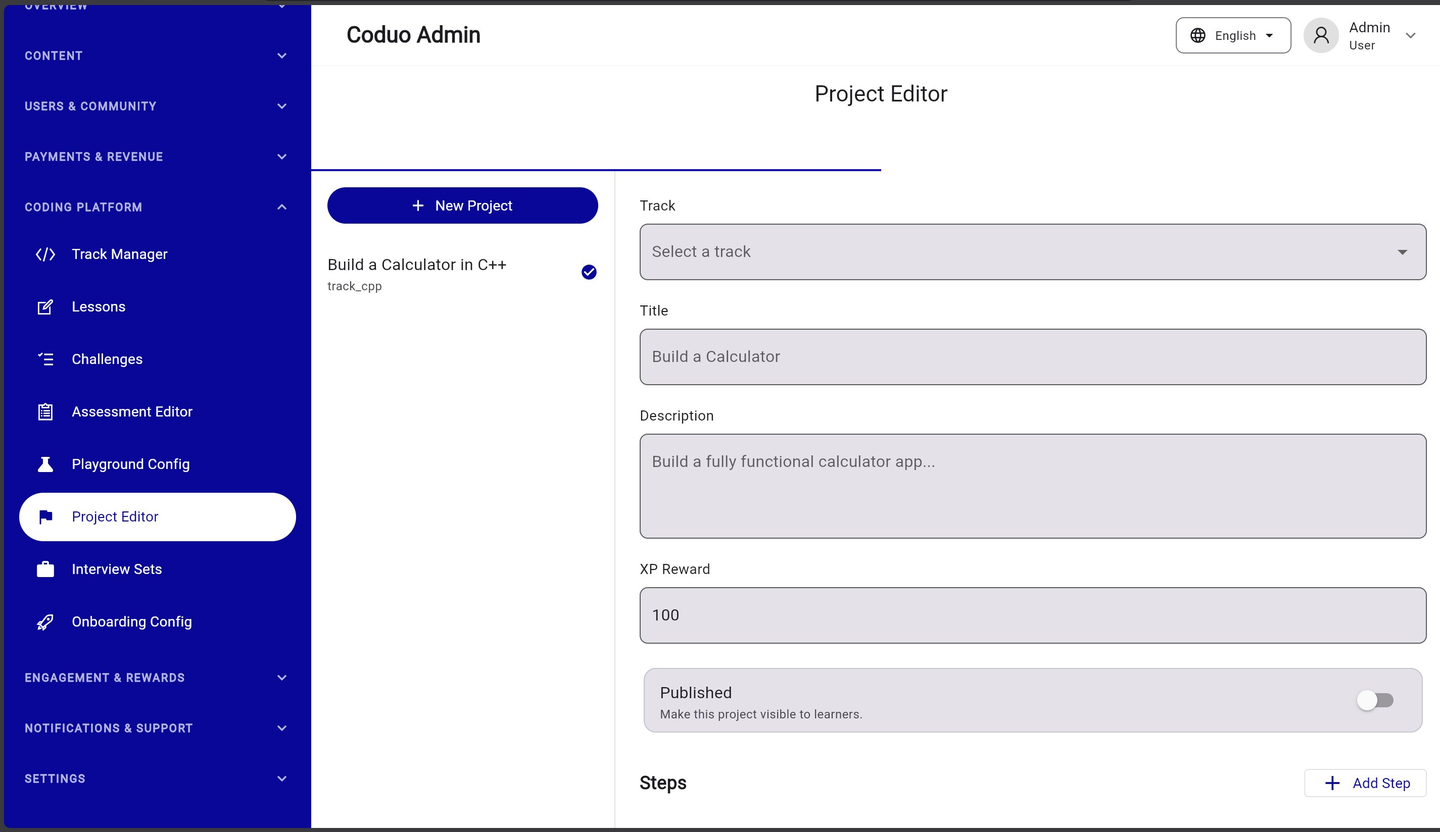
4.5 — Project Editor
Projects are capstone assignments that appear at the end of a learning track. They give learners a practical goal to apply everything they've learned. Each track can have one capstone project.
| Field | Description |
|---|---|
| Track | Select which learning track this project belongs to |
| Title | Project name (e.g. Build a Calculator in C++) |
| Description | What learners will build — shown on the project card |
| XP Reward | XP awarded on project completion |
| Published | Toggle to make the project visible in the track |
| Steps | Click “+ Add Step” to break the project into guided milestones |
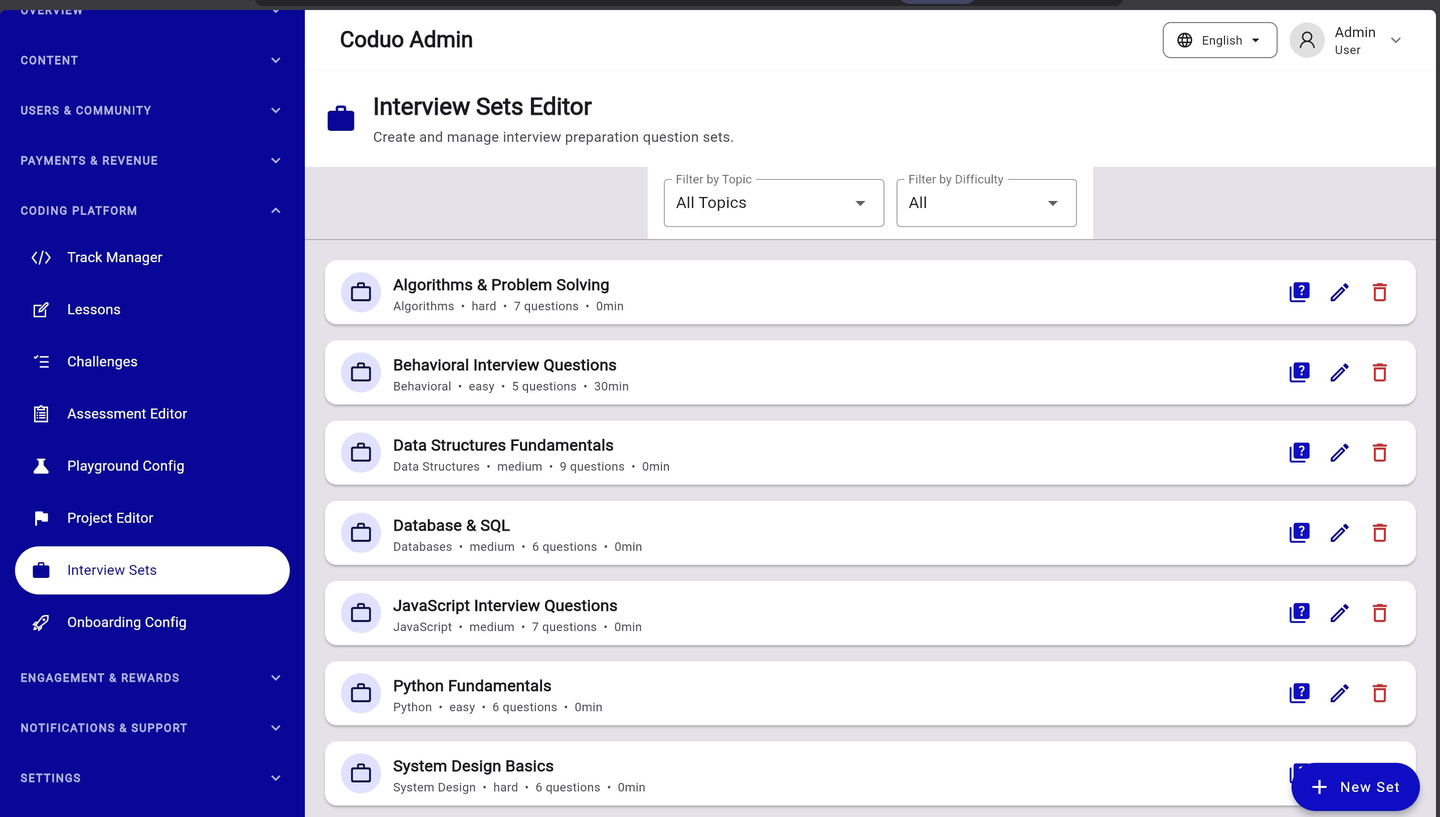
4.6 — Interview Sets Editor
Interview Sets are curated question banks for the Interview Prep feature in the mobile app. Learners take timed practice sessions from these sets to build interview confidence and track their readiness score.
Creating a New Interview Set
- Click “+ New Set”
Bottom right of the Interview Sets Editor screen.
- Enter set details
Set name, topic (e.g. Algorithms), difficulty (easy/medium/hard), and time estimate.
- Add questions
Click the “view questions” icon on any set to open its question bank and add individual questions.
- Set question format
Each question has: prompt text, expected answer type, hints, and time allocation.
Pre-Loaded Interview Set Topics
- Algorithms & Problem Solving — 7 questions, hard
- Behavioral Interview Questions — 5 questions, easy
- Data Structures Fundamentals — 9 questions, medium
- Database & SQL — 6 questions, medium
- JavaScript Interview Questions — 7 questions, medium
- Python Fundamentals — 6 questions, easy
- System Design Basics — 6 questions, hard
4.7 — Onboarding Configuration
The Onboarding Configuration controls the first-run experience for new users. When a new learner installs the app, they are asked about their goals, experience level, and daily time commitment. This screen lets you customise those options.
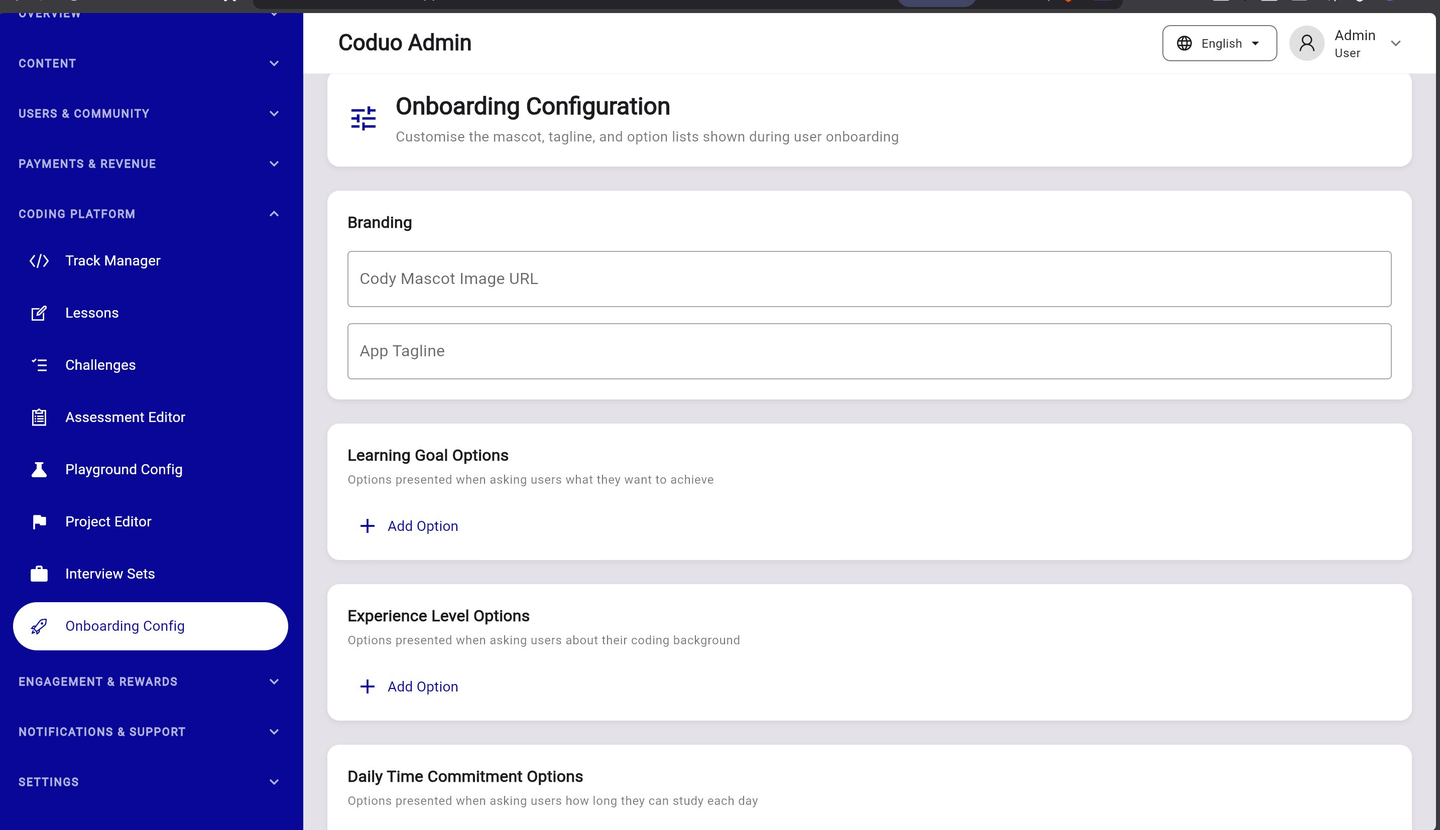
| Section | What It Controls |
|---|---|
| Branding — Mascot Image URL | The AI tutor character image shown during onboarding (upload to Firebase Storage, paste the URL) |
| Branding — App Tagline | Motivational tagline shown on the onboarding splash (e.g. “Code Daily. Think Better.”) |
| Learning Goal Options | The list of goals users can select (e.g. “Get a developer job”, “Learn for fun”, “Prepare for interviews”) |
| Experience Level Options | Self-reported experience levels (e.g. “Complete Beginner”, “Some experience”, “Professional developer”) |
| Daily Time Commitment Options | How long users say they can study daily (e.g. “5 minutes”, “10 minutes”, “30+ minutes”) |
5.1 — Streak Freeze Config
Streak Freezes let learners protect their daily streak on days they cannot study. This screen controls how expensive streak repairs are, how long the repair window lasts, and how many freezes a user can hold at once.
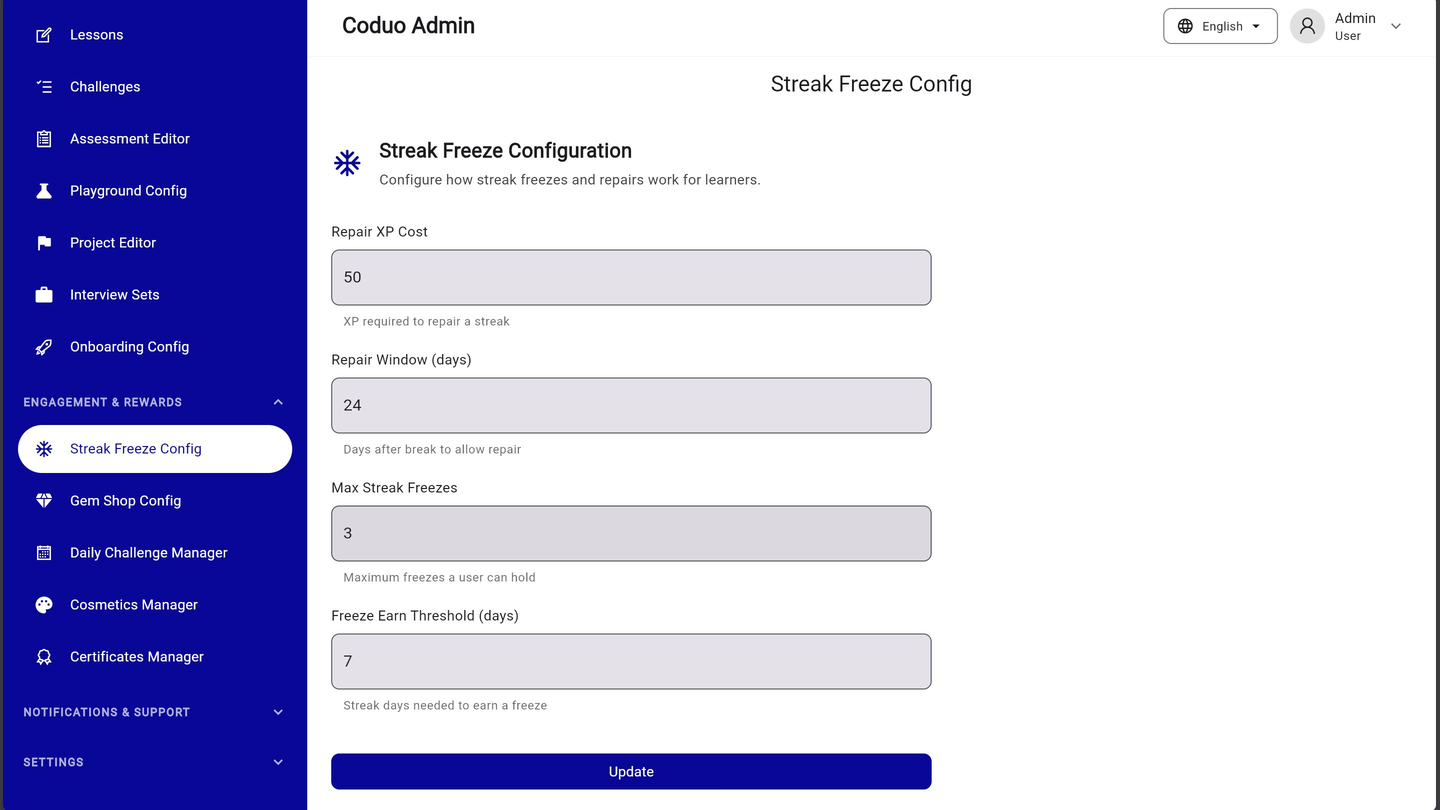
| Setting | Description | Default |
|---|---|---|
| Repair XP Cost | XP required for a user to repair a broken streak | 50 |
| Repair Window (days) | Days after a streak break during which a repair is allowed | 24 |
| Max Streak Freezes | Maximum number of freeze tokens a single user can hold at one time | 3 |
| Freeze Earn Threshold (days) | Consecutive streak days needed to earn a free freeze token | 7 |
5.2 — Gem Shop Config
Gems are the virtual currency in Coduo. Learners earn gems by completing lessons and challenges. They can spend gems in the Gem Shop on streak freezes, hint reveals, and cosmetic items. This screen sets the gem cost for each item.
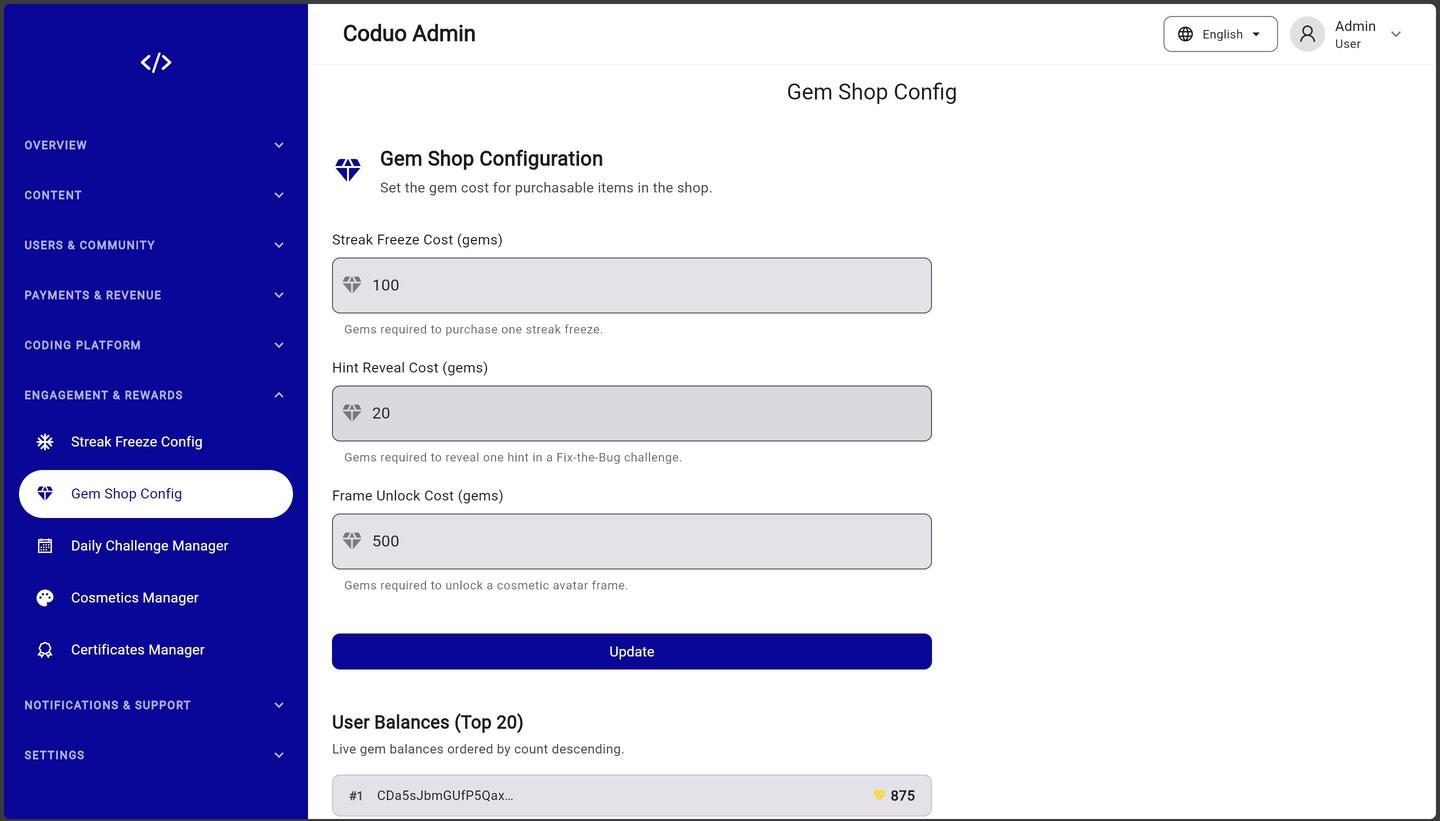
| Item | Description | Default Cost |
|---|---|---|
| Streak Freeze Cost | Gems required to purchase one streak freeze token from the shop | 100 gems |
| Hint Reveal Cost | Gems to unlock one hint in a Fix-the-Bug challenge | 20 gems |
| Frame Unlock Cost | Gems to unlock a cosmetic avatar frame | 500 gems |
Below the configuration form, the screen shows the User Balances (Top 20) — a live leaderboard of the 20 users with the highest gem balances. This is useful for monitoring gem economy health and identifying power users.
5.3 — Daily Challenge Manager
The Daily Challenge Manager schedules one coding challenge per day. Learners see a countdown timer to the next challenge and can track their 7-day completion history. You can schedule challenges weeks or months in advance using the calendar view.
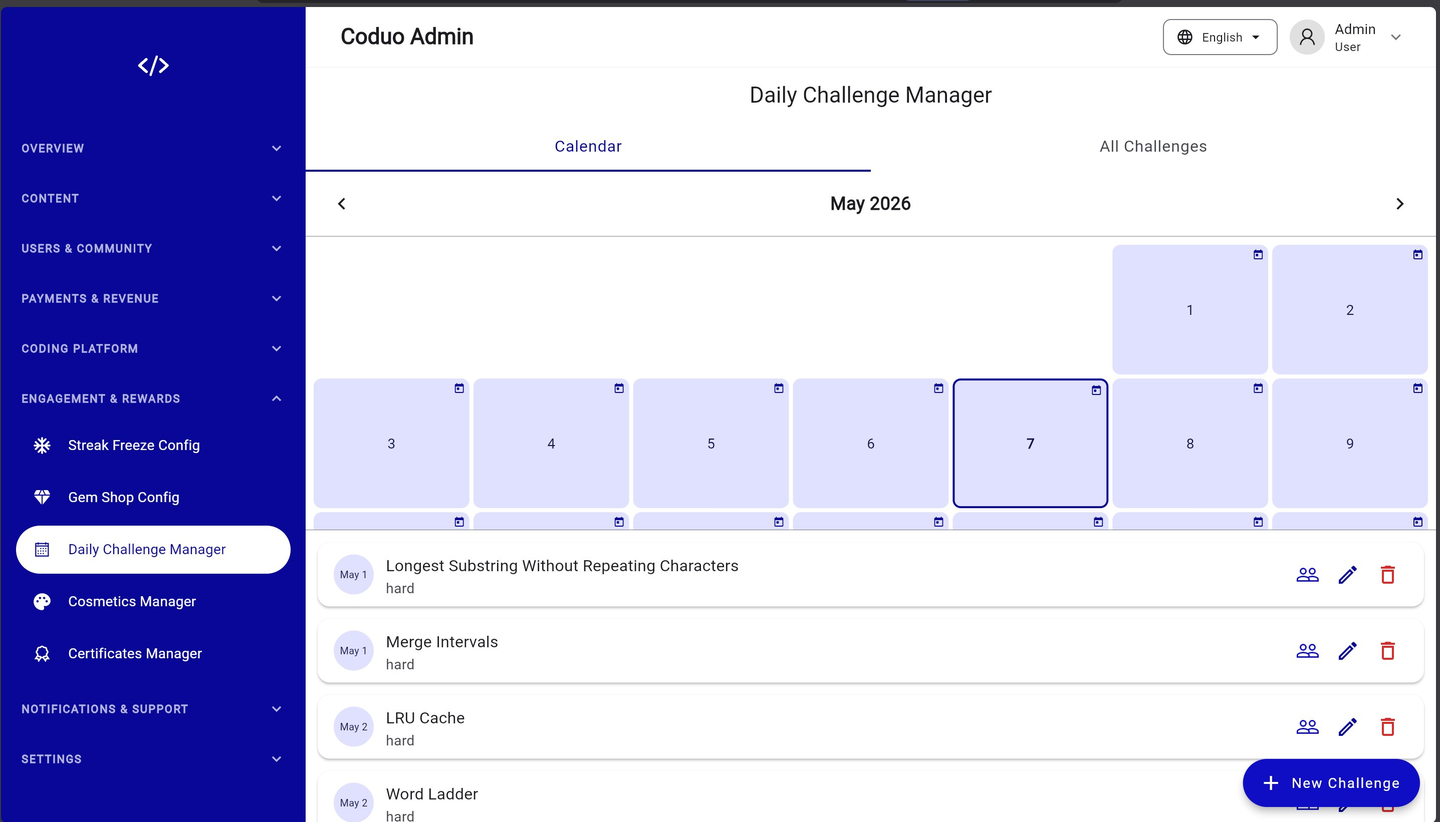
Calendar View
- Use the left/right arrows to navigate between months
- Click any date cell to assign a challenge to that day
- Dates with challenges assigned show a calendar icon in the top-right corner of the cell
- The list below the calendar shows all scheduled challenges in chronological order
Creating a New Daily Challenge
- Click “+ New Challenge”
Bottom right button on the Daily Challenge Manager screen.
- Fill in the Edit Challenge form
Title, Description, Problem Statement (markdown), Starter Code (optional), and select the challenge date.
- Save
The challenge is scheduled and will automatically become available to learners on the assigned date.
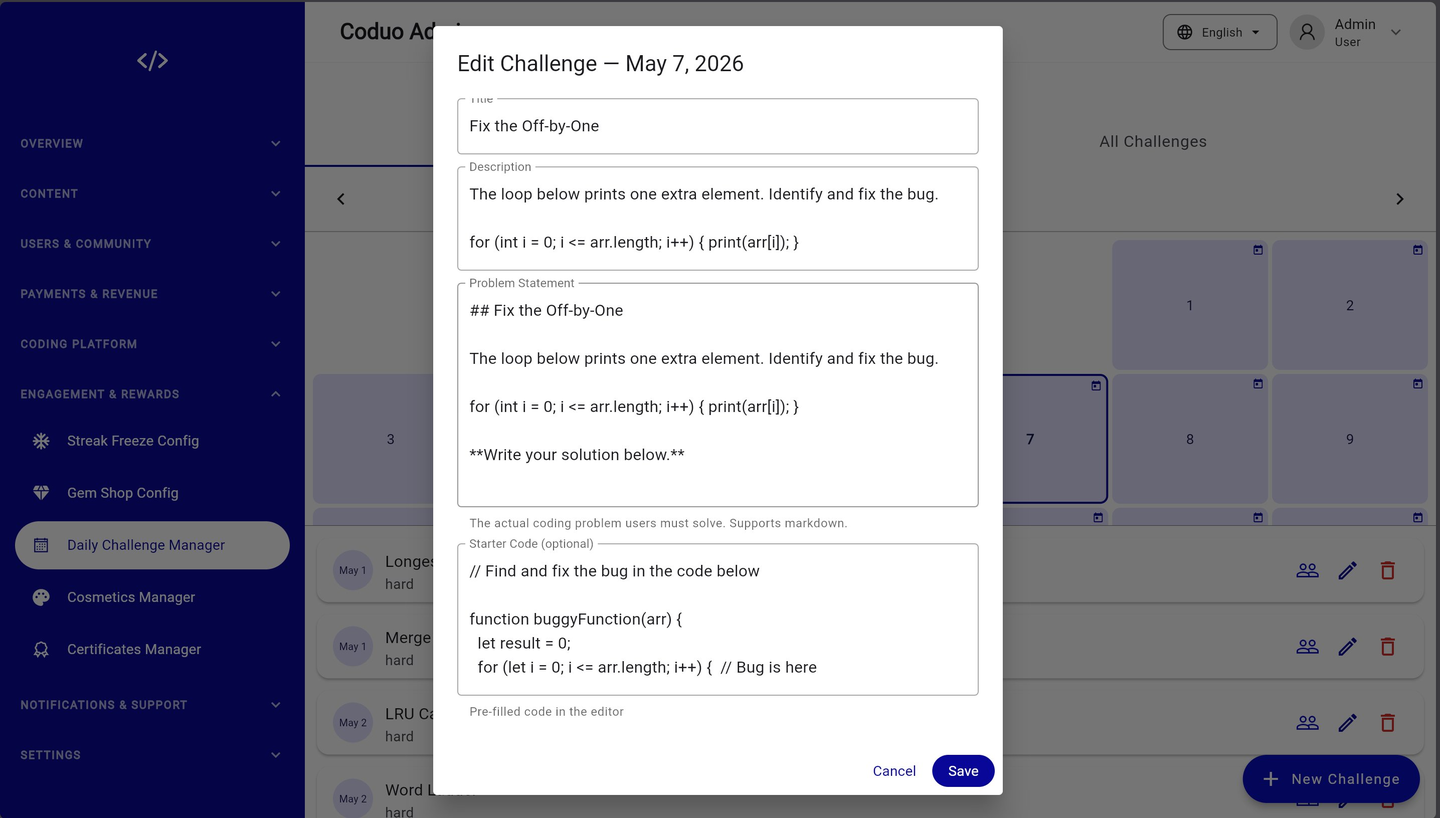
| Field | Description |
|---|---|
| Title | Challenge name shown to learners (e.g. Fix the Off-by-One) |
| Description | One-line summary of what the challenge involves |
| Problem Statement | Full problem description in Markdown (supports code blocks, headings, bold) |
| Starter Code | Pre-filled code shown in the editor — useful for Fix-the-Bug challenges |
| Assign Participants | View which users have attempted or completed this challenge |
5.4 — Certificates Manager
Certificates are issued automatically when a learner completes an entire learning track. The Certificates Manager has three tabs: All Certificates (view all issued certs), Configuration (set your branding), and Verify Certificate (authenticate any cert by ID).
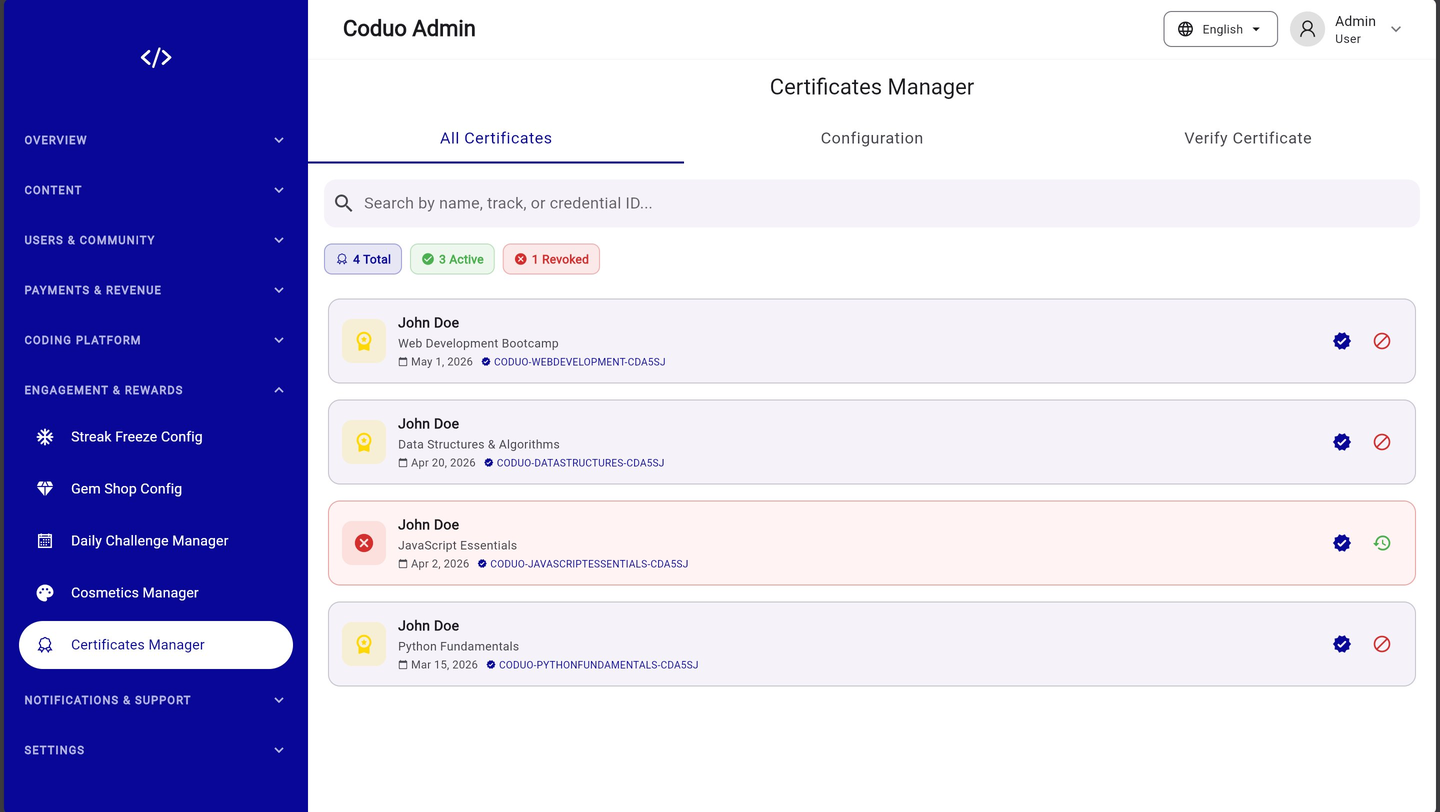
Certificate Status
| Status | Meaning |
|---|---|
| Active | Certificate is valid and can be verified by employers or institutions |
| Revoked | Certificate has been invalidated — shown with a red background row |
Certificate Template Configuration
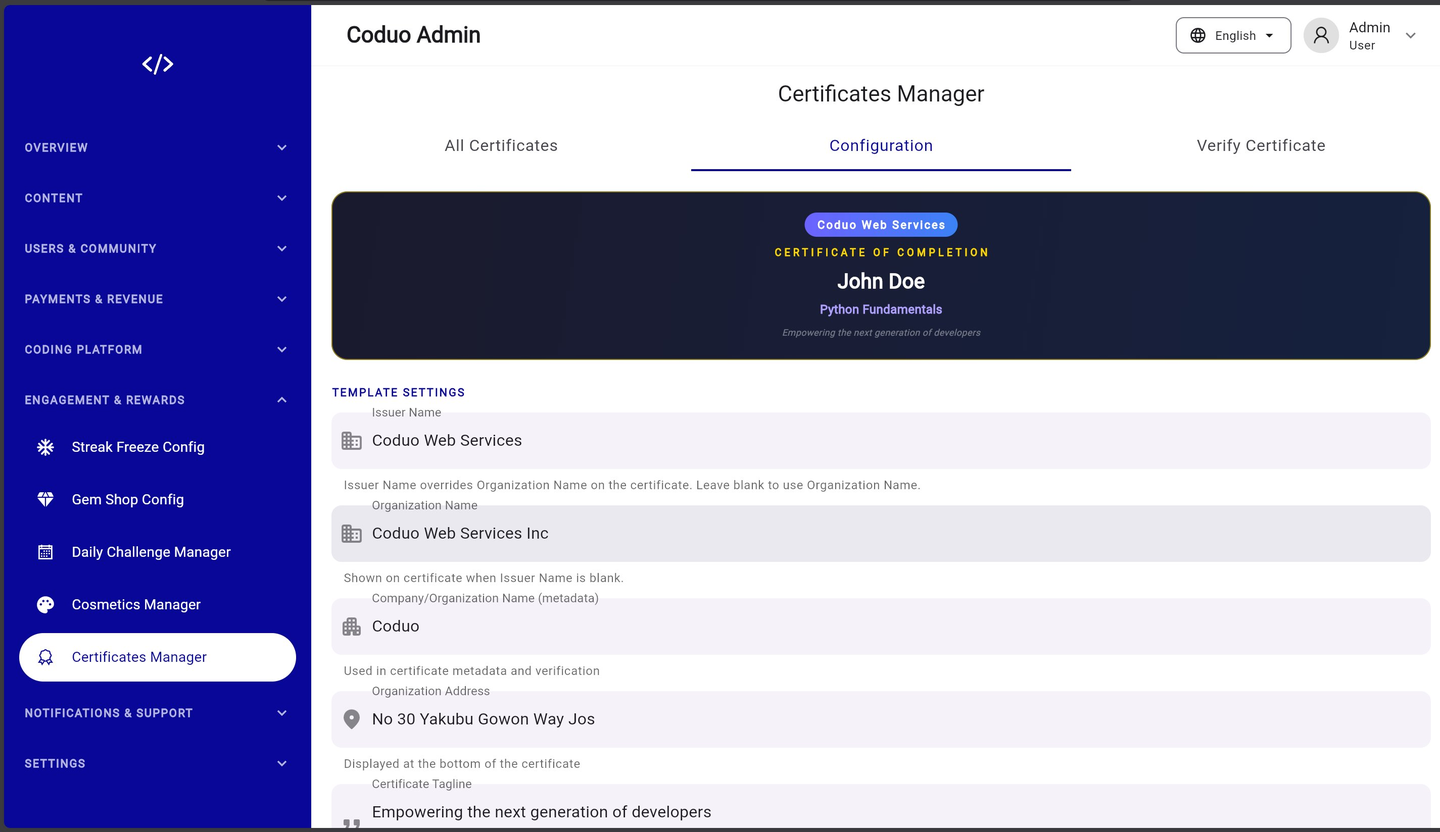
| Field | Description |
|---|---|
| Issuer Name | Name shown prominently on the certificate (e.g. Coduo Web Services) |
| Organization Name | Shown when Issuer Name is blank |
| Company/Organization Name (metadata) | Used in verification metadata and digital signature |
| Organization Address | Displayed at the bottom of the certificate |
| Certificate Tagline | Motivational subtitle (e.g. “Empowering the next generation of developers”) |
Verifying a Certificate
Use the Verify Certificate tab to confirm whether a credential ID is authentic. Employers, institutions, or the admin can enter a credential ID and get an immediate Valid/Invalid response.
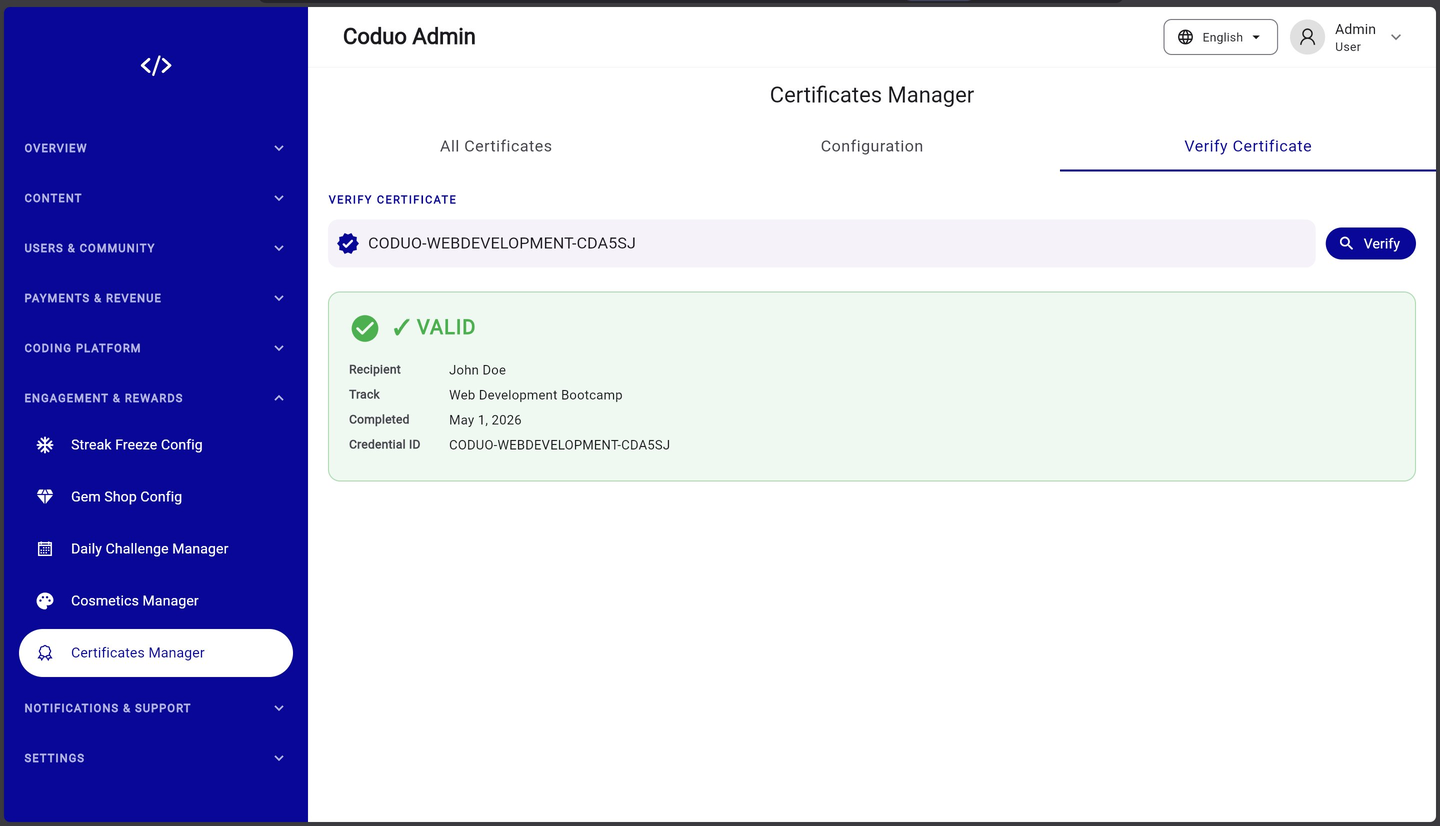
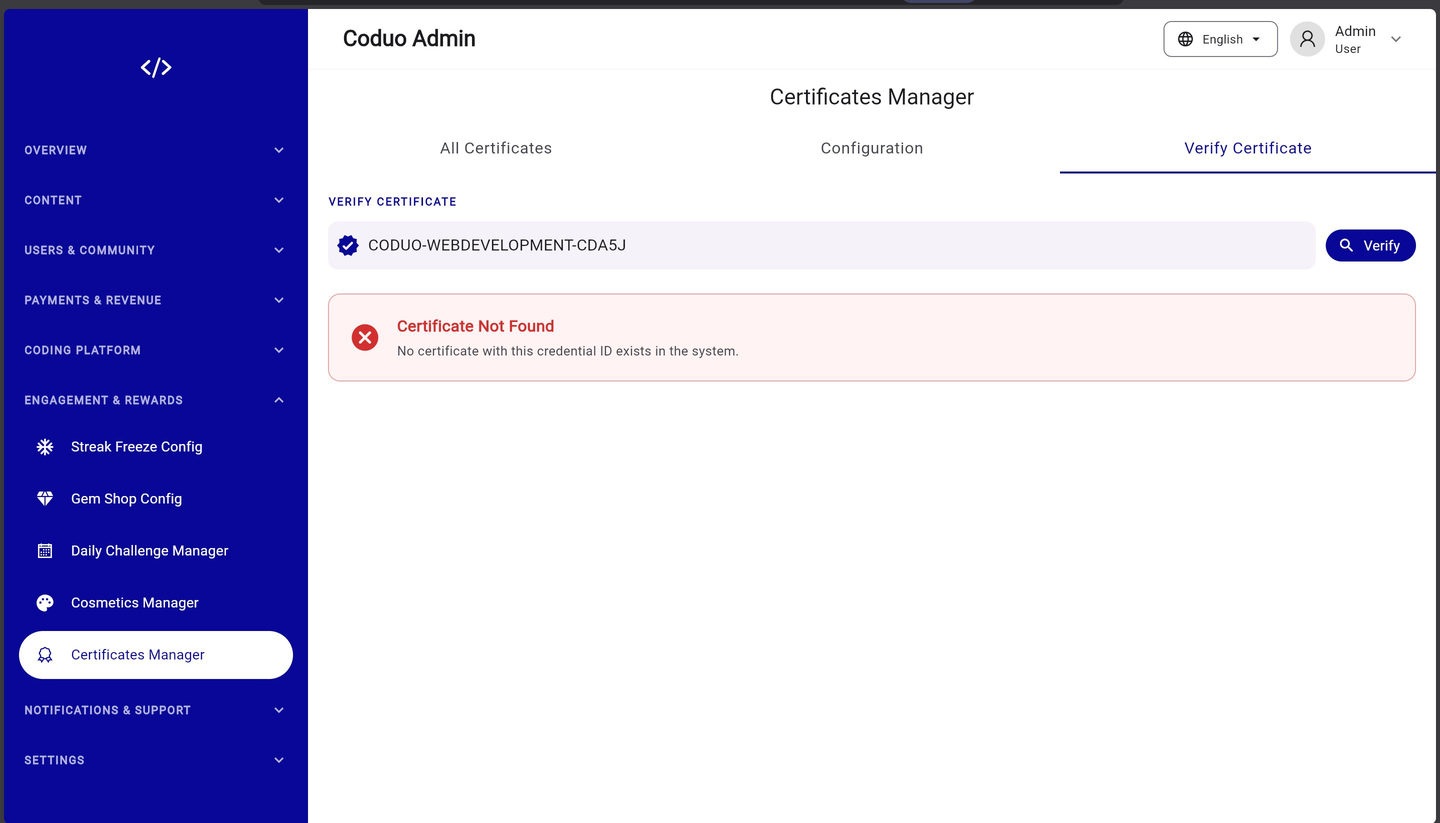
https://YOUR_ADMIN_URL/#/verify
6.1 — App Settings
App Settings is where you control the global branding and configuration of your platform — the name, logos, social links, legal URLs, and store links that appear throughout the mobile app and admin panel.

Branding Section
| Field | Description |
|---|---|
| App Name | The name of your app — appears on splash screen, app bar, and home screen icon label |
| Tagline | Short motivational phrase shown on the onboarding screen (e.g. “Code Daily, Think Better.”) |
| Light Logo URL | URL of your logo for light backgrounds (login page, splash). Upload to Firebase Storage → paste download URL. |
| Dark / Sidebar Logo URL | URL of your logo for dark backgrounds (admin sidebar, dark mode screens) |
How to Update Logos via App Settings
- Upload logo to Firebase Storage
Firebase Console → Storage → Upload your PNG logo file. Right-click → Get Download URL.
- Paste URL in App Settings
Paste the Firebase Storage download URL into the Light Logo URL or Dark Logo URL field.
- Click Upload (or Save Changes)
The URL is saved to Firestore. The app reads it dynamically — no rebuild required.
Other App Settings Sections
- Social Links — Facebook, Twitter/X, Instagram, YouTube URLs for your community pages
- Legal — Privacy Policy URL, Terms of Service URL (required for App Store compliance)
- Store Links — Google Play Store URL and Apple App Store URL (used for share and rating prompts)
- Support — Support email address shown in the app's help section
6.2 — AdMob Settings
AdMob Settings controls all advertising for your mobile app. You can enable/disable ads globally, and configure the App ID and ad unit IDs for each ad format. Premium users automatically see no ads regardless of this setting.
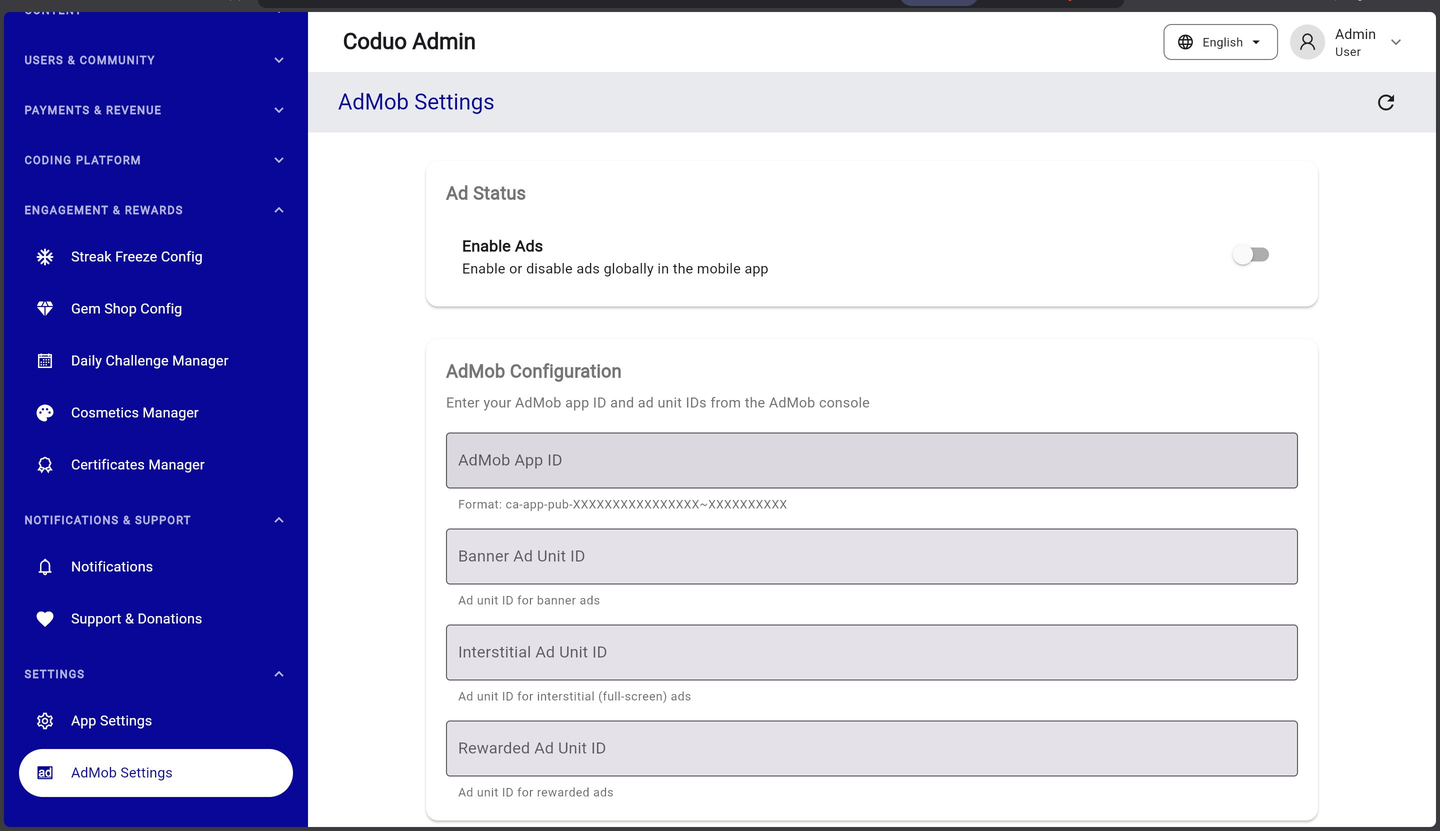
Ad Status
| Toggle | Effect |
|---|---|
| Enable Ads — ON | Ads are shown to free-tier users throughout the app (home banner, challenge interstitial) |
| Enable Ads — OFF | No ads are shown to any users regardless of subscription tier |
AdMob Configuration Fields
| Field | Format & Description |
|---|---|
| AdMob App ID | Format: ca-app-pub-XXXXXXXXXXXXXXXX~XXXXXXXXXX — from AdMob Console → Apps → your app → App ID |
| Banner Ad Unit ID | Format: ca-app-pub-XXXXXXXXXXXXXXXX/XXXXXXXXXX — shown at the bottom of the home screen |
| Interstitial Ad Unit ID | Format: ca-app-pub-XXXXXXXXXXXXXXXX/XXXXXXXXXX — full-screen ad shown after challenge completion |
| Rewarded Ad Unit ID | Format: ca-app-pub-XXXXXXXXXXXXXXXX/XXXXXXXXXX — user watches to earn gems |
show_ads_to_premium: false in Firestore (admob_configuration/default) ensures Premium users never see ads. This is the default setting — do not change it unless you have a specific reason.
7.1 — The Editor Role Explained
The Editor role is designed for content creators — writers, instructors, or subject matter experts who need to add and update learning content without having access to financial data, user management, or platform settings.
How to Assign the Editor Role
- Go to Users
Sidebar → USERS & COMMUNITY → Users
- Find the user
Search by email or scroll to find the user you want to promote
- Open their action menu
Click the three-dot menu on the right of their row
- Select “Assign As Editor”
The user's role badge immediately changes from student to editor
- Inform the user
They now see a different version of the admin panel when they log in — with content tools only
Editor Access Summary
| Section | Editor Can | Editor Cannot |
|---|---|---|
| Track Manager | Create and edit tracks, modules | Delete tracks |
| Lessons | Create and edit lessons, exercises | Delete lessons |
| Challenges | Create and edit challenges | Delete challenges |
| Daily Challenges | Schedule and edit daily challenges | Delete daily challenges |
| Users & Community | No access | No access |
| Payments & Revenue | No access | No access |
| Engagement & Rewards | No access | No access |
| Settings | No access | No access |
| Dashboard | Content stats only (editor dashboard) | Platform-wide stats |
Common Admin Tasks
A quick-reference table for the most frequent actions you'll perform in the admin panel.
| Task | Where to Go | How |
|---|---|---|
| See platform stats | Overview → Platform Overview | Check the 4 stat cards and 3 charts |
| Find a user | Users & Community → Users | Search by email in the search field |
| View a user's progress | Users → click a user row | User Profile modal shows XP, streaks, job readiness |
| Promote a user to Editor | Users → context menu → Assign As Editor | Role badge changes to “editor” immediately |
| Create a learning track | Coding Platform → Track Manager → + Add New Track | Fill in the Edit Track form, add modules |
| Add a lesson | Track Manager → track → module → + Add Lesson | Build lesson items in the Lesson Builder |
| Create a standalone challenge | Coding Platform → Challenges → + New Challenge | Fill form, write problem statement in markdown |
| Schedule a daily challenge | Engagement & Rewards → Daily Challenge Manager → + New Challenge | Select date, write title and problem |
| Verify a certificate | Engagement & Rewards → Certificates Manager → Verify Certificate tab | Paste credential ID → click Verify |
| Process a bank transfer | Payments & Revenue → Bank Transfers | Review proof of payment → Approve or Reject |
| Change subscription plan price | Payments & Revenue → Subscription Plans → edit icon | Edit price and save |
| Enable/disable ads | Settings → AdMob Settings | Toggle “Enable Ads” |
| Update app logo | Settings → App Settings → Logo section | Upload to Firebase Storage → paste URL → Save Changes |
| Check audit trail | Overview → Audit Logs | Filter by action type, user ID, or date range |
| Change gem prices | Engagement & Rewards → Gem Shop Config | Update costs and click Update |